The Static Site Guide • Chapter 5
Customizing Your Hugo Website
We’ve installed a theme and customized it, but as we just saw, our website is still just a skeleton. Let’s start adding content by creating our first blog post.
Creating a Blog Post
Since static sites are just collections of files, we can manually create a new plain text file for our blog post. I’ve generated a sample blog post that we can use as an example. Using VS Code, copy and paste the following text into a new file and save it in heroic-tiramisu/content/posts/my-first-post.md.
+++
title = "My First Post"
date = "2023-01-02T16:38:40-07:00"
author = "Me"
draft = false
+++

Bacon ipsum dolor amet meatloaf capicola ball tip pancetta
tri-tip. Filet mignon beef ribs cow, chicken tongue salami
fatback burgdoggen boudin pork tail shoulder short loin
flank. Brisket hamburger ground round, landjaeger beef
ribs ribeye alcatra jowl tail cupim.

Venison pork shank rump, alcatra swine pancetta strip steak
shankle burgdoggen pork belly chicken beef ribs turkey
chislic. Cow bresaola pancetta porchetta, alcatra bacon
buffalo burgdoggen ribeye beef ribs flank andouille short
ribs t-bone.
This is a Markdown file, as indicated by the .md file extension. All of the text in the file—except for the metadata at the top of the file—can be formatted using Markdown syntax and HTML. Feel free to edit the content as you see fit.
💡 Tip: Shameless plug! If you’re new to Markdown, I suggest reading The Markdown Guide, one of my other books.
Notice how the lines at the top of the document are formatted in TOML and contain important metadata for the file. You can customize these values. Hugo uses this information to do things like create the title for the page, insert the date for the blog post into the layout, and decide whether or not to publish the blog post on the production website.
Now let’s preview our website again. Switch to your terminal application, and then enter the following command:
hugo serve
Use the local server’s address (localhost:1313) to load the website in your web browser. The new blog post should appear on the home page, as shown below. You can click the link (the title of the post) to view the entire blog post.
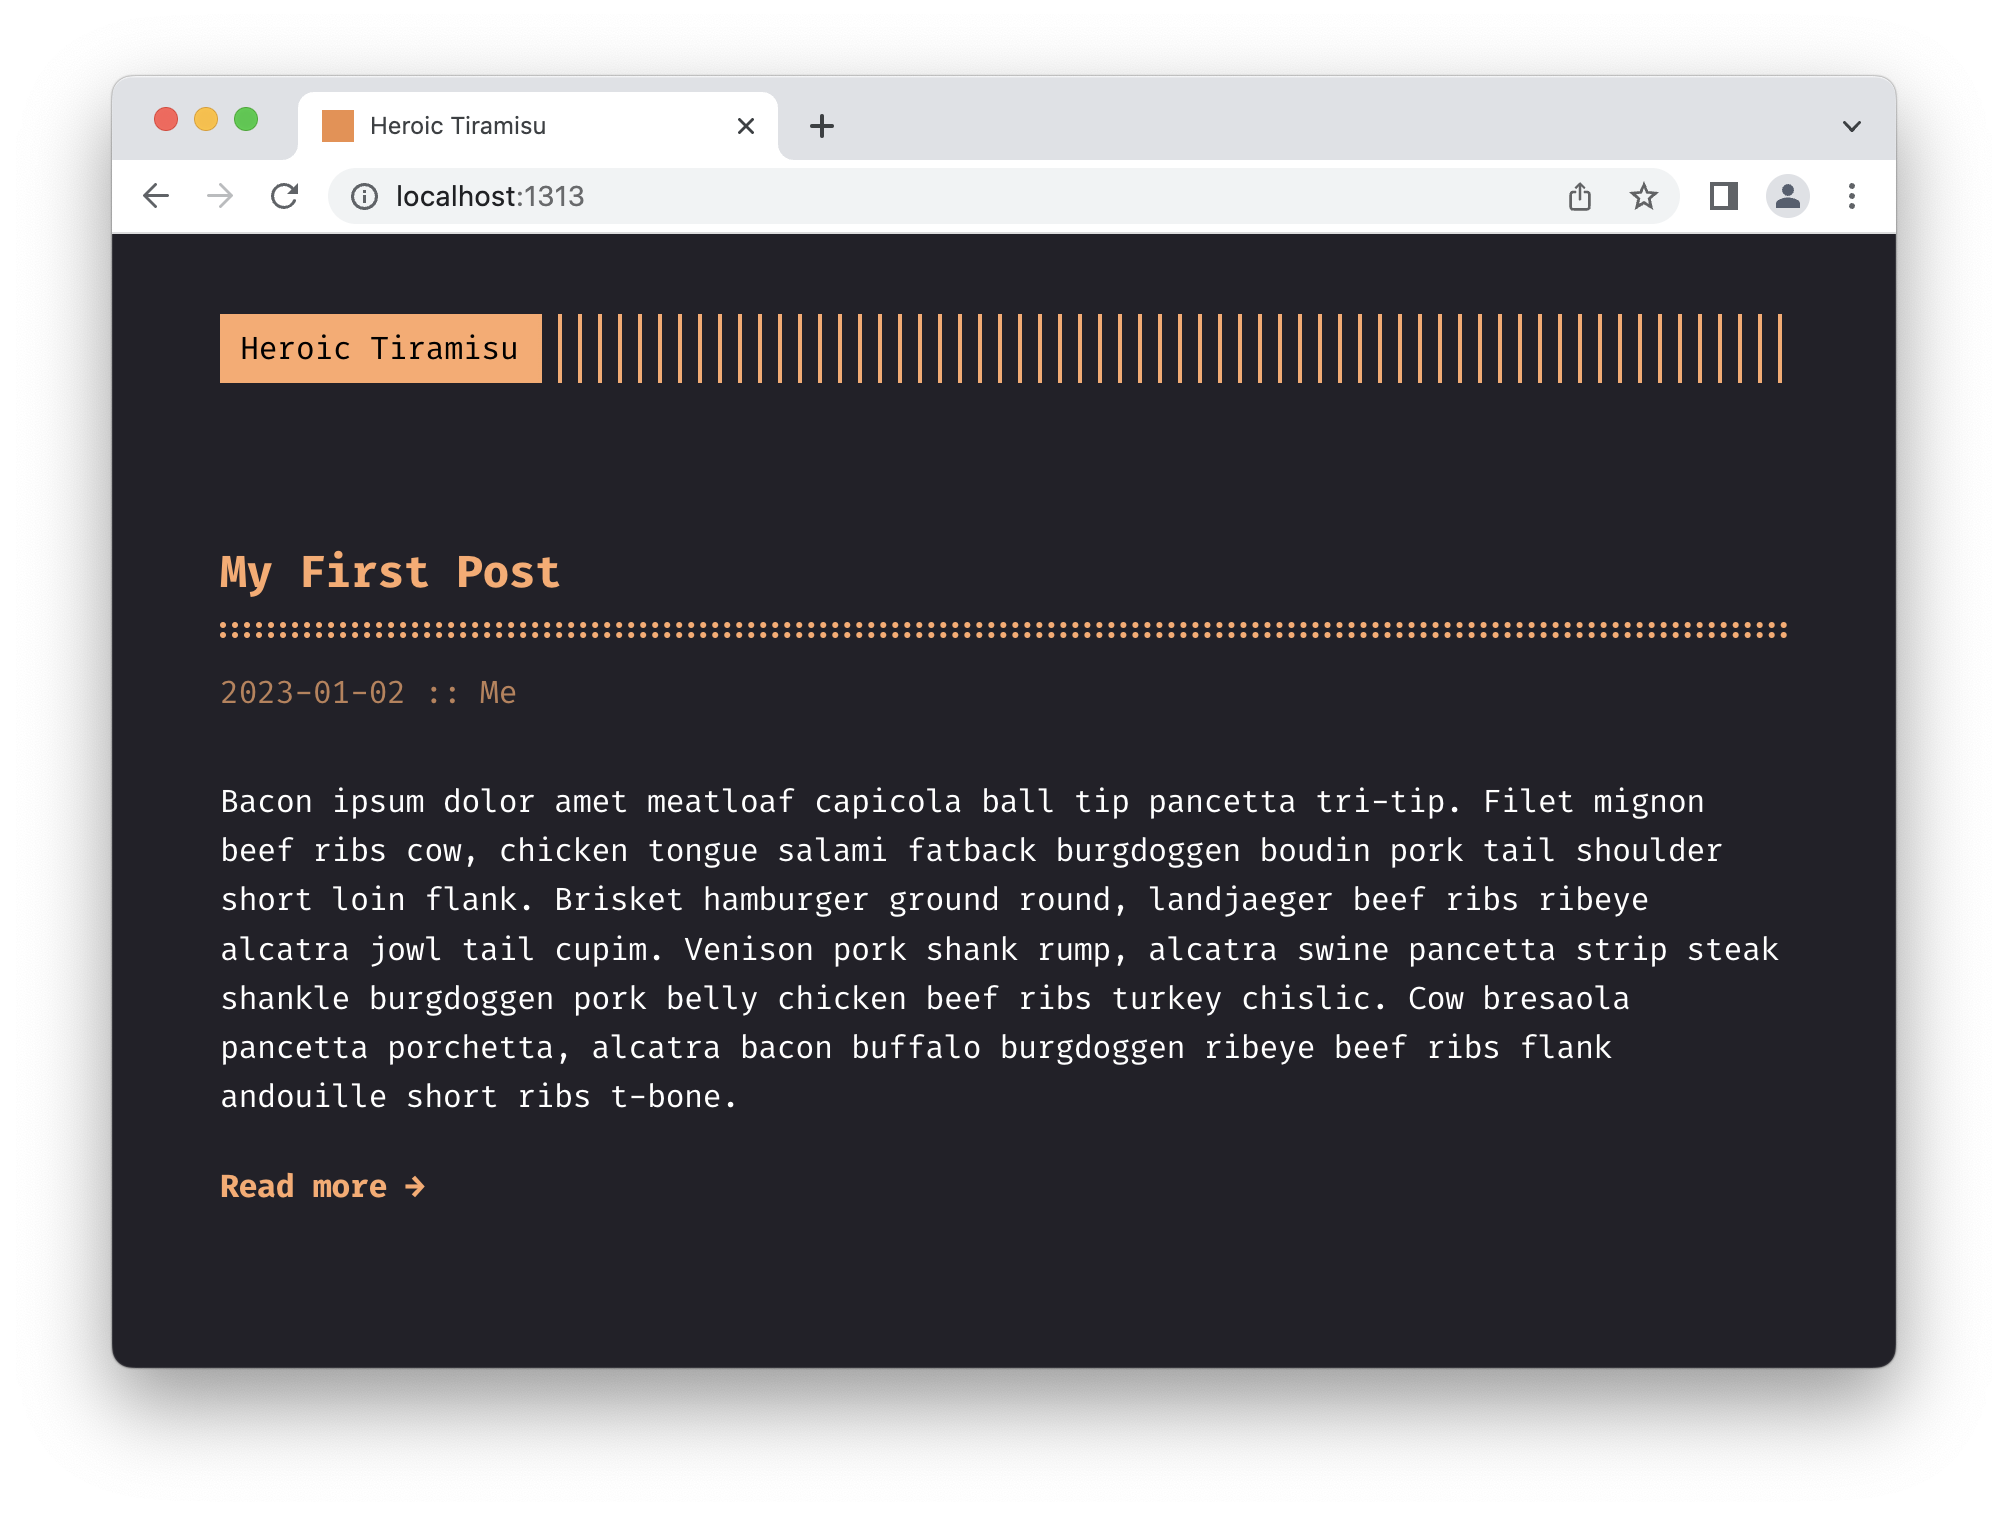
Congratulations! You’ve successfully created your first blog post! The homepage shows a summary of the blog post, and when you click on the title of the post, the entire text appears.
Notice how the URL changes when you visit the blog post: http://localhost:1313/posts/my-first-post/. See how the URL structure matches the directory structure? Hugo doesn’t do anything fancy with URLs. It just builds the site according to the directory structure that you specify. The result is a website with clean, predictable URLs—just like how our first website worked.
Try changing the content of this Markdown file, save the changes in VS Code, and then see what happens to the website!
Using Archetypes
We just created our first blog post by copying and pasting text into a plain text file. In the future, we can use a Hugo command to create a new file for a blog post.
To simplify the process of creating a new blog post from scratch, Hugo allows us to create a template, or archetype, for new blog posts. When we run the Hugo command to create a blog post, Hugo will use the content in the archetype file to automatically generate the metadata at the top of the blog post file. The content in the archetype file will appear at the top of the generated blog post file.
Let’s update the archetype now. Using VS Code, open the posts.md archetype file in heroic-tiramisu/themes/terminal/archetypes/. Delete the existing content in that file, and then copy and paste the following content into the file:
+++
title = "{{ replace .TranslationBaseName "-" " " | title }}"
date = "{{ .Date }}"
author = ""
draft = "false"
+++
Save the changes to the posts.md file.
You’ve just been introduced to one of Hugo’s most powerful features: templates. Take another look at the content you pasted into the posts.md file. The contents of the title and date are written in the Go templating language.
When we run the Hugo command to create a blog post, Hugo will use the logic in the archetype, combined with the information we provide, to fill in the blanks in our blog post file. For example, Hugo will take the file name we provide, parse it, and insert it as the title in the metadata. Hugo will also insert our computer’s date and time as the date in the metadata.
Creating a Blog Post With an Archetype
Let’s take a look at how it works. Enter the following command to create a new blog post from the archetype:
hugo new posts/my-newest-post.md
The first part of the command (hugo new) tells Hugo to create a new file using the posts.md archetype in the location we specify in the second part of the command (posts/my-newest-post.md). If everything works, you should see the following output:
mcone@wombat heroic-tiramisu % hugo new posts/my-newest-post.md
Content "/Users/mcone/Documents/heroic-tiramisu/content/posts/my-newest-post.md" created
Let’s open the file Hugo created for our new blog post in VS Code and look at it. The file is located at heroic-tiramisu/content/posts/my-newest-post.md. You should see the following contents when you open the file in VS Code:
+++
title = "My Newest Post"
date = "2023-01-16T09:43:47-07:00"
author = ""
draft = "false"
+++
See how Hugo automatically inserted the title and date for us? Pretty neat, right?
Adding a Cover Image
Of course, just because the metadata was created automatically doesn’t mean we can’t change it. The Terminal theme allows us to specify a cover image for our blog post. Let do that now by adding an image in a new directory: heroic-tiramisu/static/img. Any image will do. I’ll use a free photo of Old Town Albuquerque, one of my favorite places.
Now we can update our front matter to include the cover image:
+++
title = "My Newest Post"
date = "2023-01-16T09:43:47-07:00"
author = "Me"
cover = "img/old-town.jpg"
draft = "false"
+++
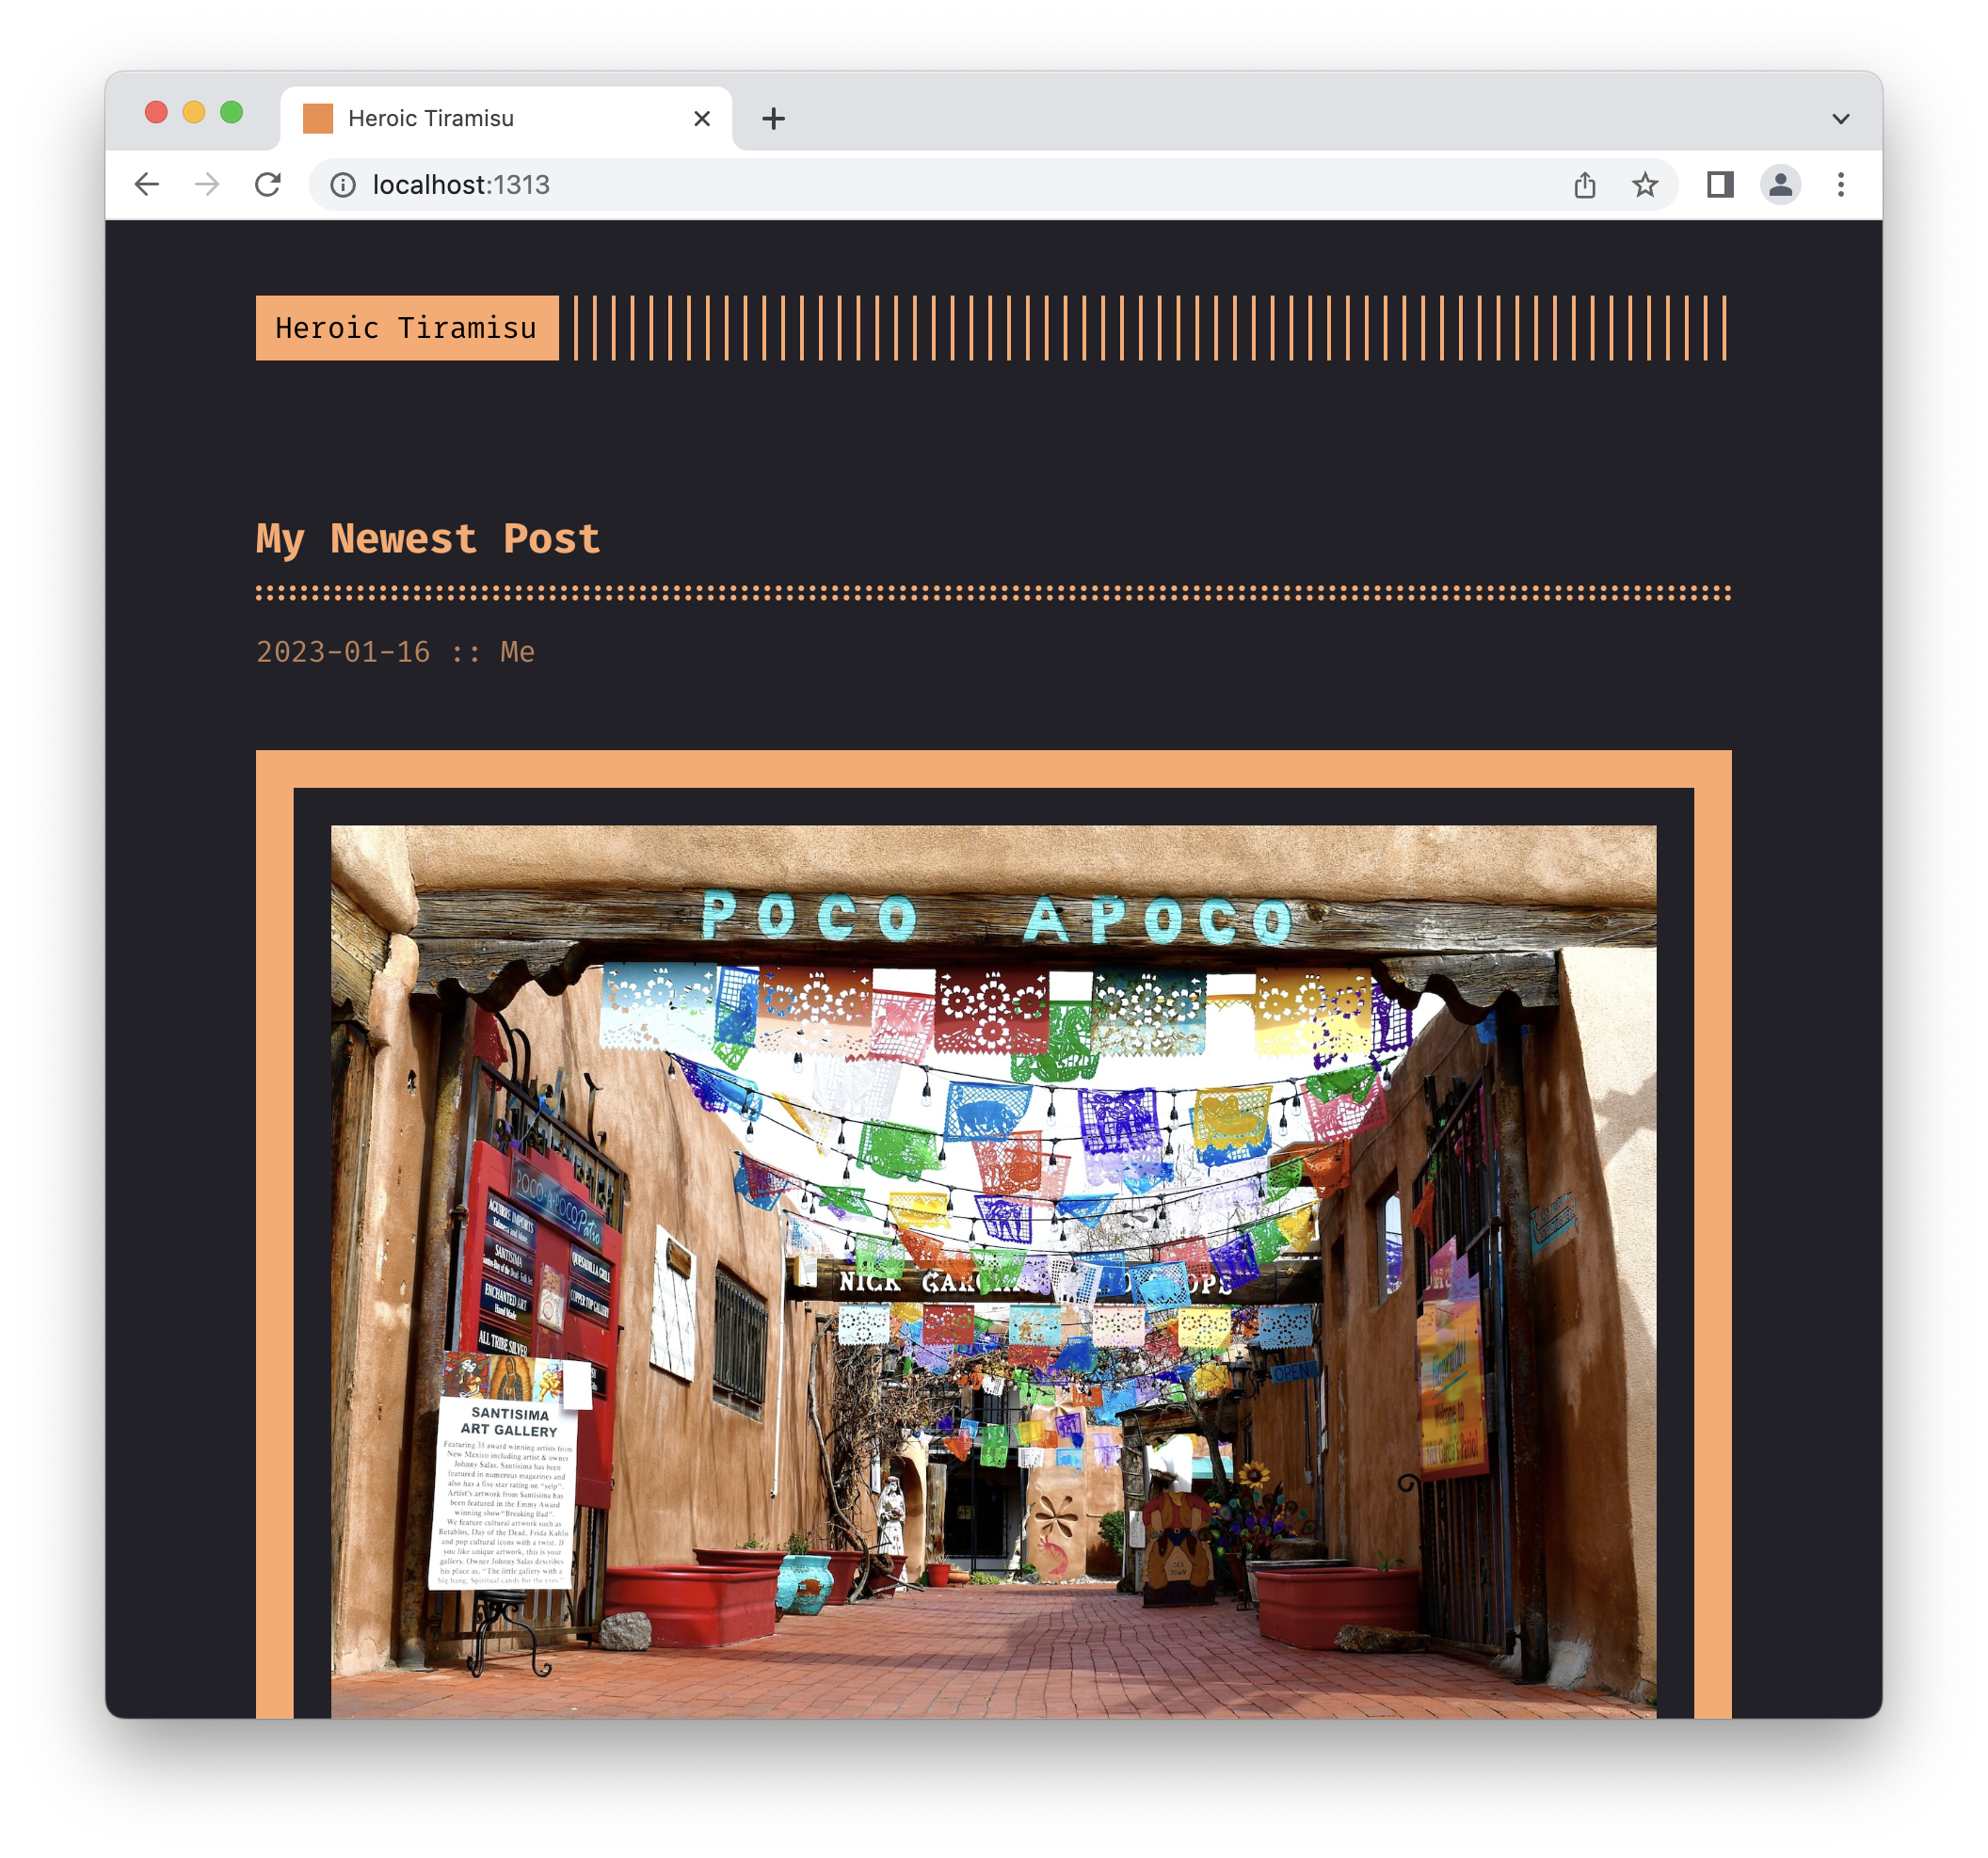
Let’s save the changes to the my-newest-post.md file and preview our website again. If you left the Hugo server running in your terminal application, you can switch back to your web browser to see the updates—your web browser should have reloaded the changes automatically. You should see the image at the top of the homepage, as shown below. Hugo automatically adds new blog posts to the top of the homepage.
💡 Tip: If you don’t see the image, double check that you put the image file in
heroic-tiramisu/static/imgand typed the file name correctly in the front matter. Most problems can attributed to spelling mistakes or confusion about the path to the image file.
Our blog post is up! If we wanted to continue building out our blog post, we could add Markdown-formatted content in the body of the file. Try doing it on your own if you’re feeling inspired. Get the hang of creating new posts with the hugo new command, then manually update their content using VS Code.
Adding an About Page
We know how to create blog posts, but what about “evergreen” pages linked to in the top navigation, like an About page? The Terminal theme has support for these types of pages built in. Let’s add one now.
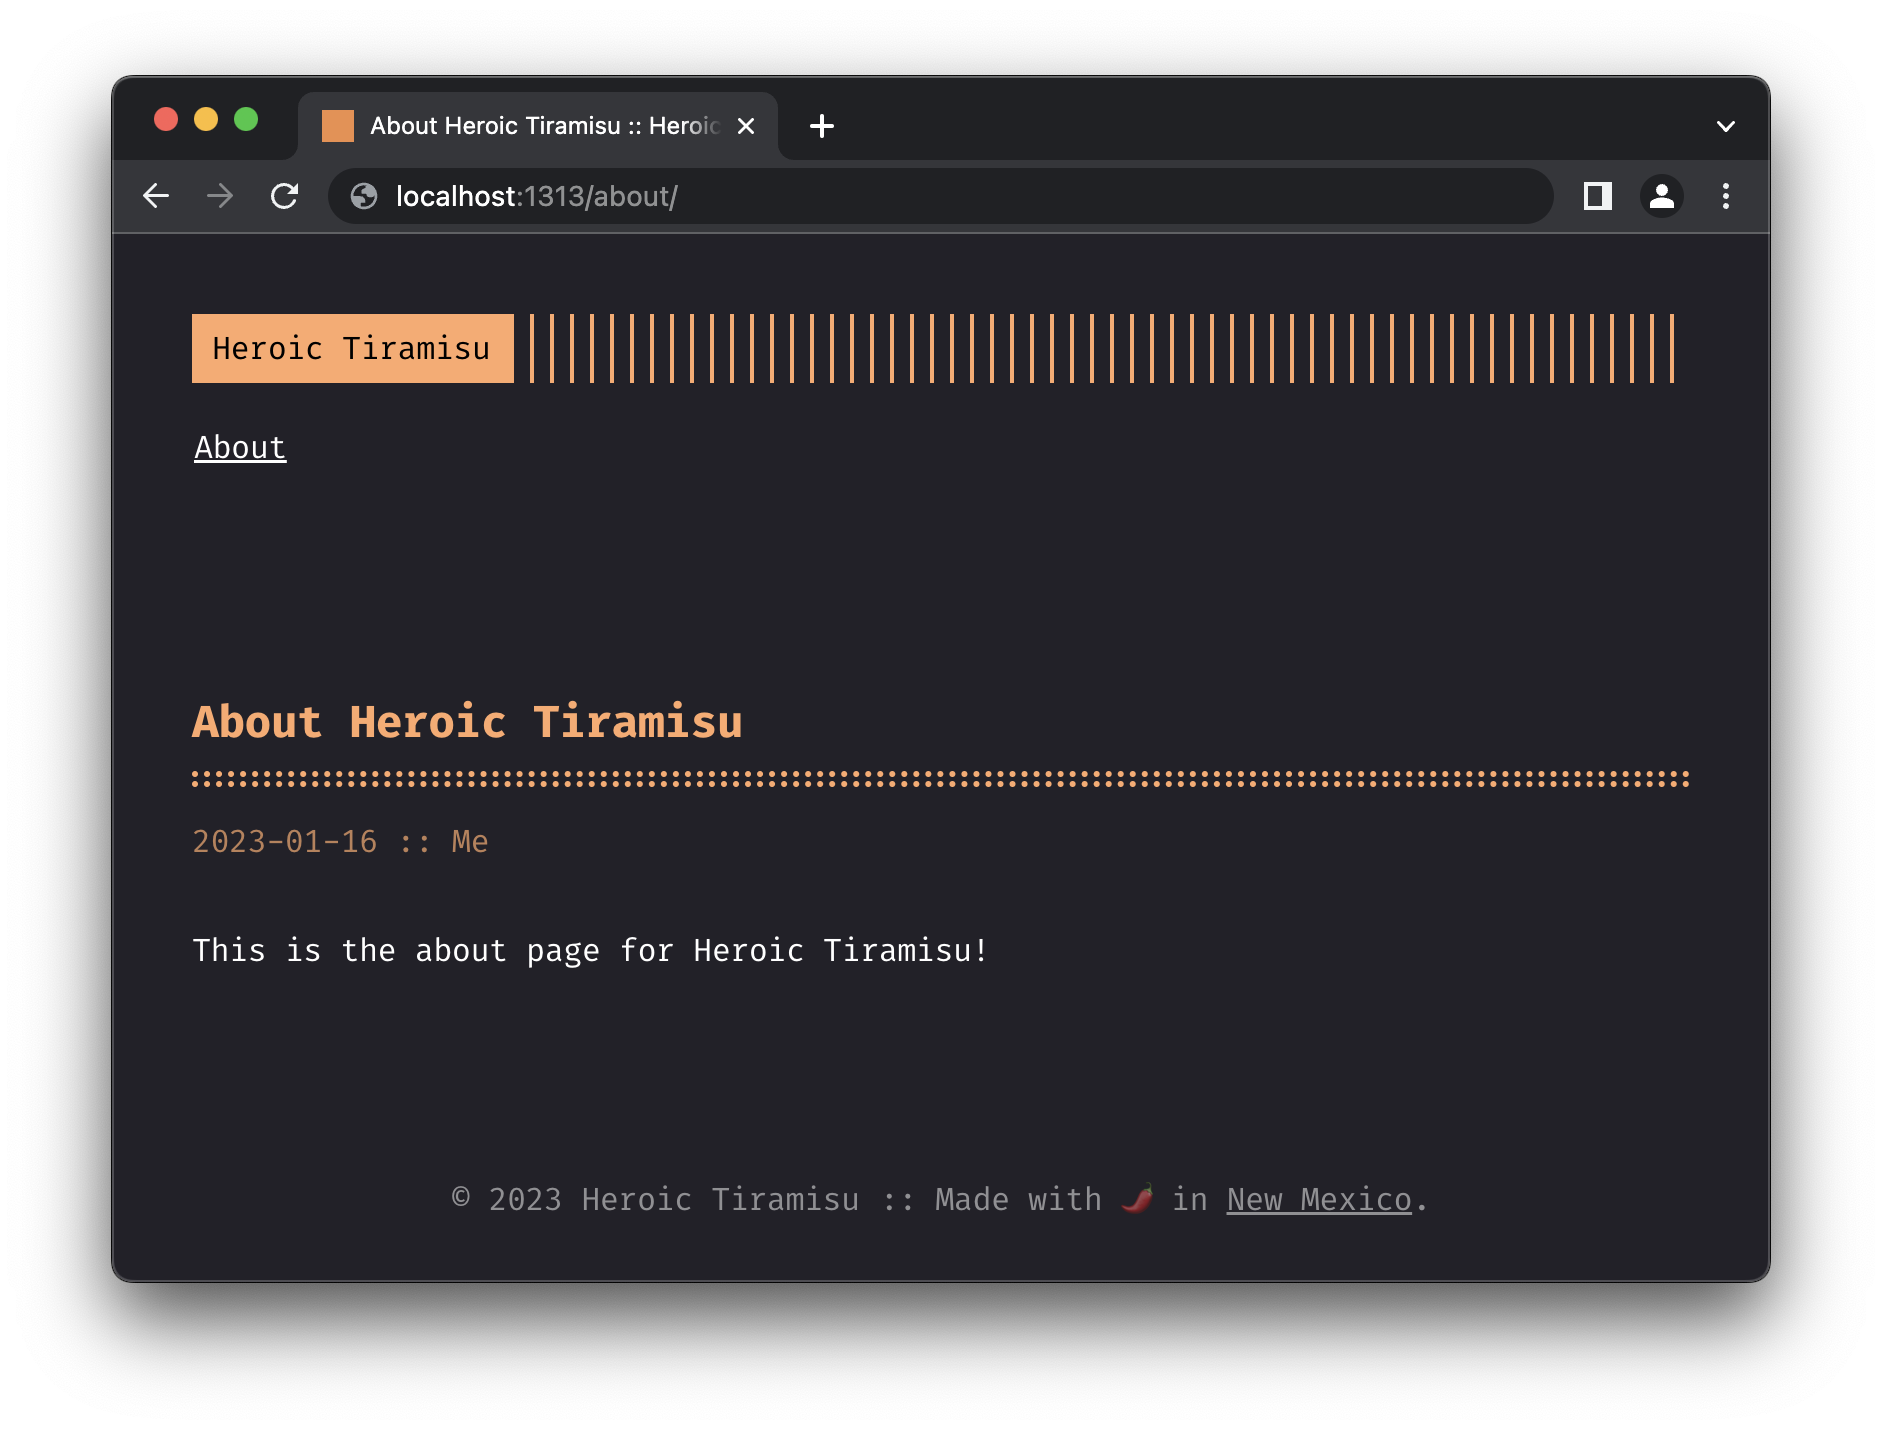
Using VS Code, create a new file called about.md in heroic-tiramisu/content/, and then copy and paste the following content into the file:
+++
title = "About Heroic Tiramisu"
date = "2023-01-16"
author = "Me"
+++

This is the about page for Heroic Tiramisu!
Save the changes to the about.md file.
Now we need to update the config.toml file to add the link to the About page in the top navigation. The Terminal theme will use this information to create the link in the top navigation. Open the config.toml file in VS Code and add the highlighted lines shown below to the bottom of the file.
baseURL = "/"
languageCode = "en-us"
theme = "terminal"
paginate = 5

[params]
  contentTypeName = "posts"
  themeColor = "orange"
  showMenuItems = 1
  fullWidthTheme = false
  centerTheme = true

[languages]
  [languages.en.params]
    languageName = "English"
    title = "Heroic Tiramisu"
    subtitle = "A delicious example site for the Static Guide."
    owner = "Heroic Tiramisu"
    keywords = ""
    copyright = "© 2024 Heroic Tiramisu"
    menuMore = "Show more"
    readMore = "Read more"
    readOtherPosts = "Read other posts"
    newerPosts = "Newer posts"
    olderPosts = "Older posts"
    missingContentMessage = "Page not found..."
    missingBackButtonLabel = "Back to home page"

    [languages.en.params.logo]
      logoText = "Heroic Tiramisu"
      logoHomeLink = "/"

    [languages.en.params.menu]
      [[languages.en.menu.main]]
        identifier = "about"
        name = "About"
        url = "/about"
Save the changes to the config.toml file.
Let’s preview our website again. If you left the Hugo server running in your terminal application, you can switch back to your web browser to see the updates—your web browser should have reloaded the changes automatically. You should see the link to the About page in the top navigation, as shown below.
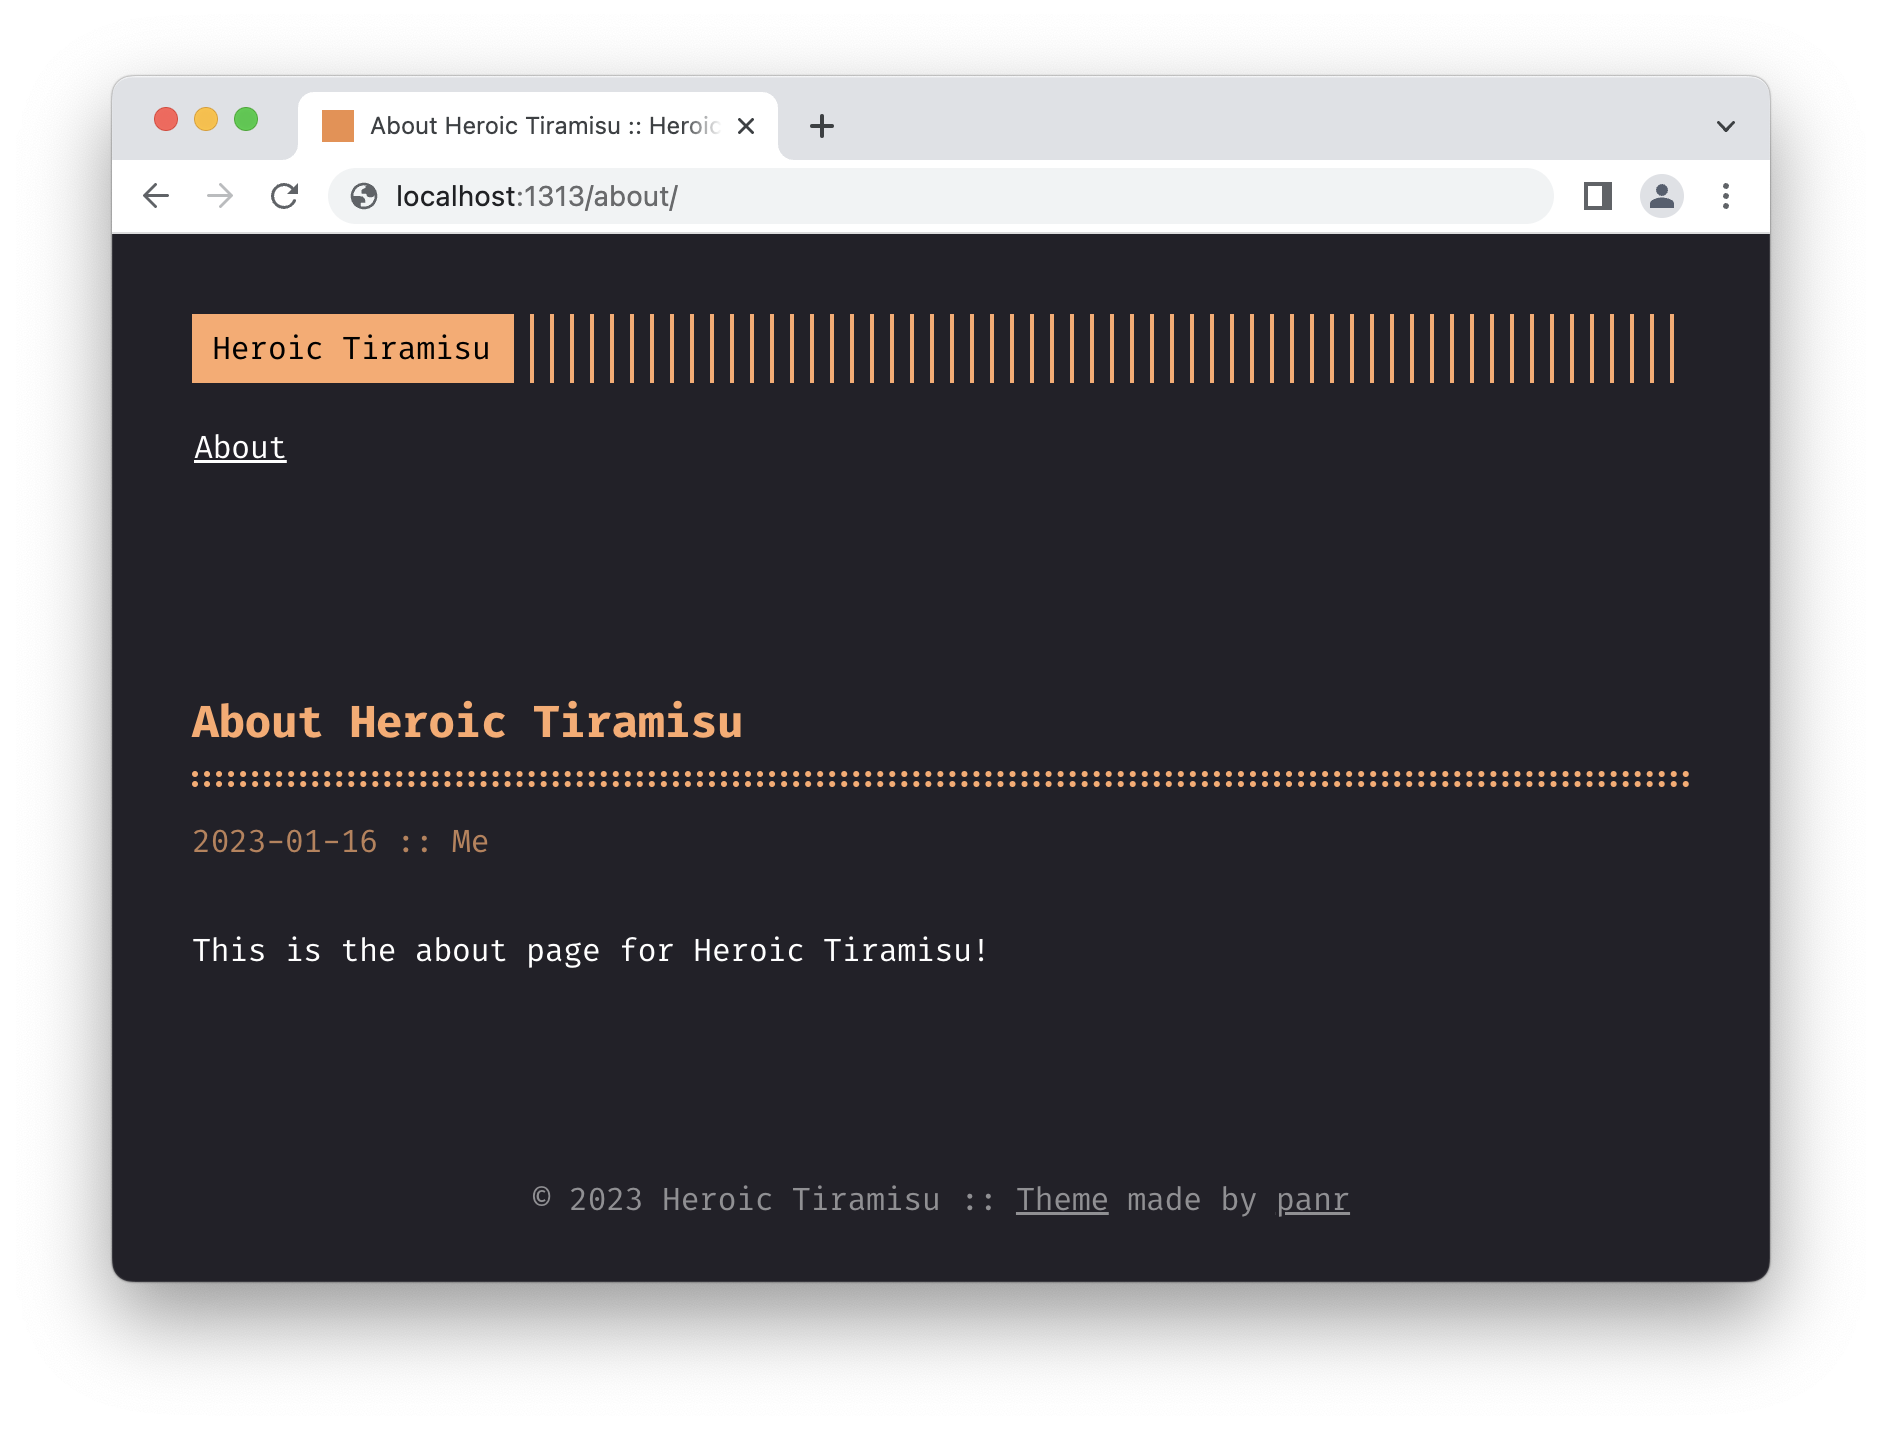
Nice work—our About page is published! You can add more pages to your website using the same process.
Modifying the Theme
We’ve installed Hugo, we’ve added some blog posts and evergreen content, and we’ve previewed our website. If we were satisfied with the way our website looked, we could stop here. But at this point, you probably know what’s coming next—more tinkering!
It’s time to apply some of the HTML and CSS knowledge you learned earlier. In this section, you’ll learn how to modify the Terminal theme to make it look the way you want.
Editing the Footer
The first order of business is editing the footer. With all due respect to the author of this theme, we can improve the professional look of our website by removing the text that reads “Theme made by panr.” Let’s remove that and then add a bit of our own HTML.
But where do we start? We know that the files for the theme live in heroic-tiramisu/themes/terminal, but beyond that, we don’t really know where anything is. Fortunately, VS Code has a search feature that allows us to search all of the files in the heroic-tiramisu directory for specific words or phrases. When you don’t know which file you need to edit, start with the search feature.
To access the VS Code search feature, click the magnifying glass icon in the sidebar, as shown below. You can enter one or more words to search for in the Search box. In this case, we’ll search for two of the words in the footer: made by. Sure enough, one of the files contains the phrase, and it’s the footer.html file. Click the file name in the sidebar to open it in the VS Code editor.
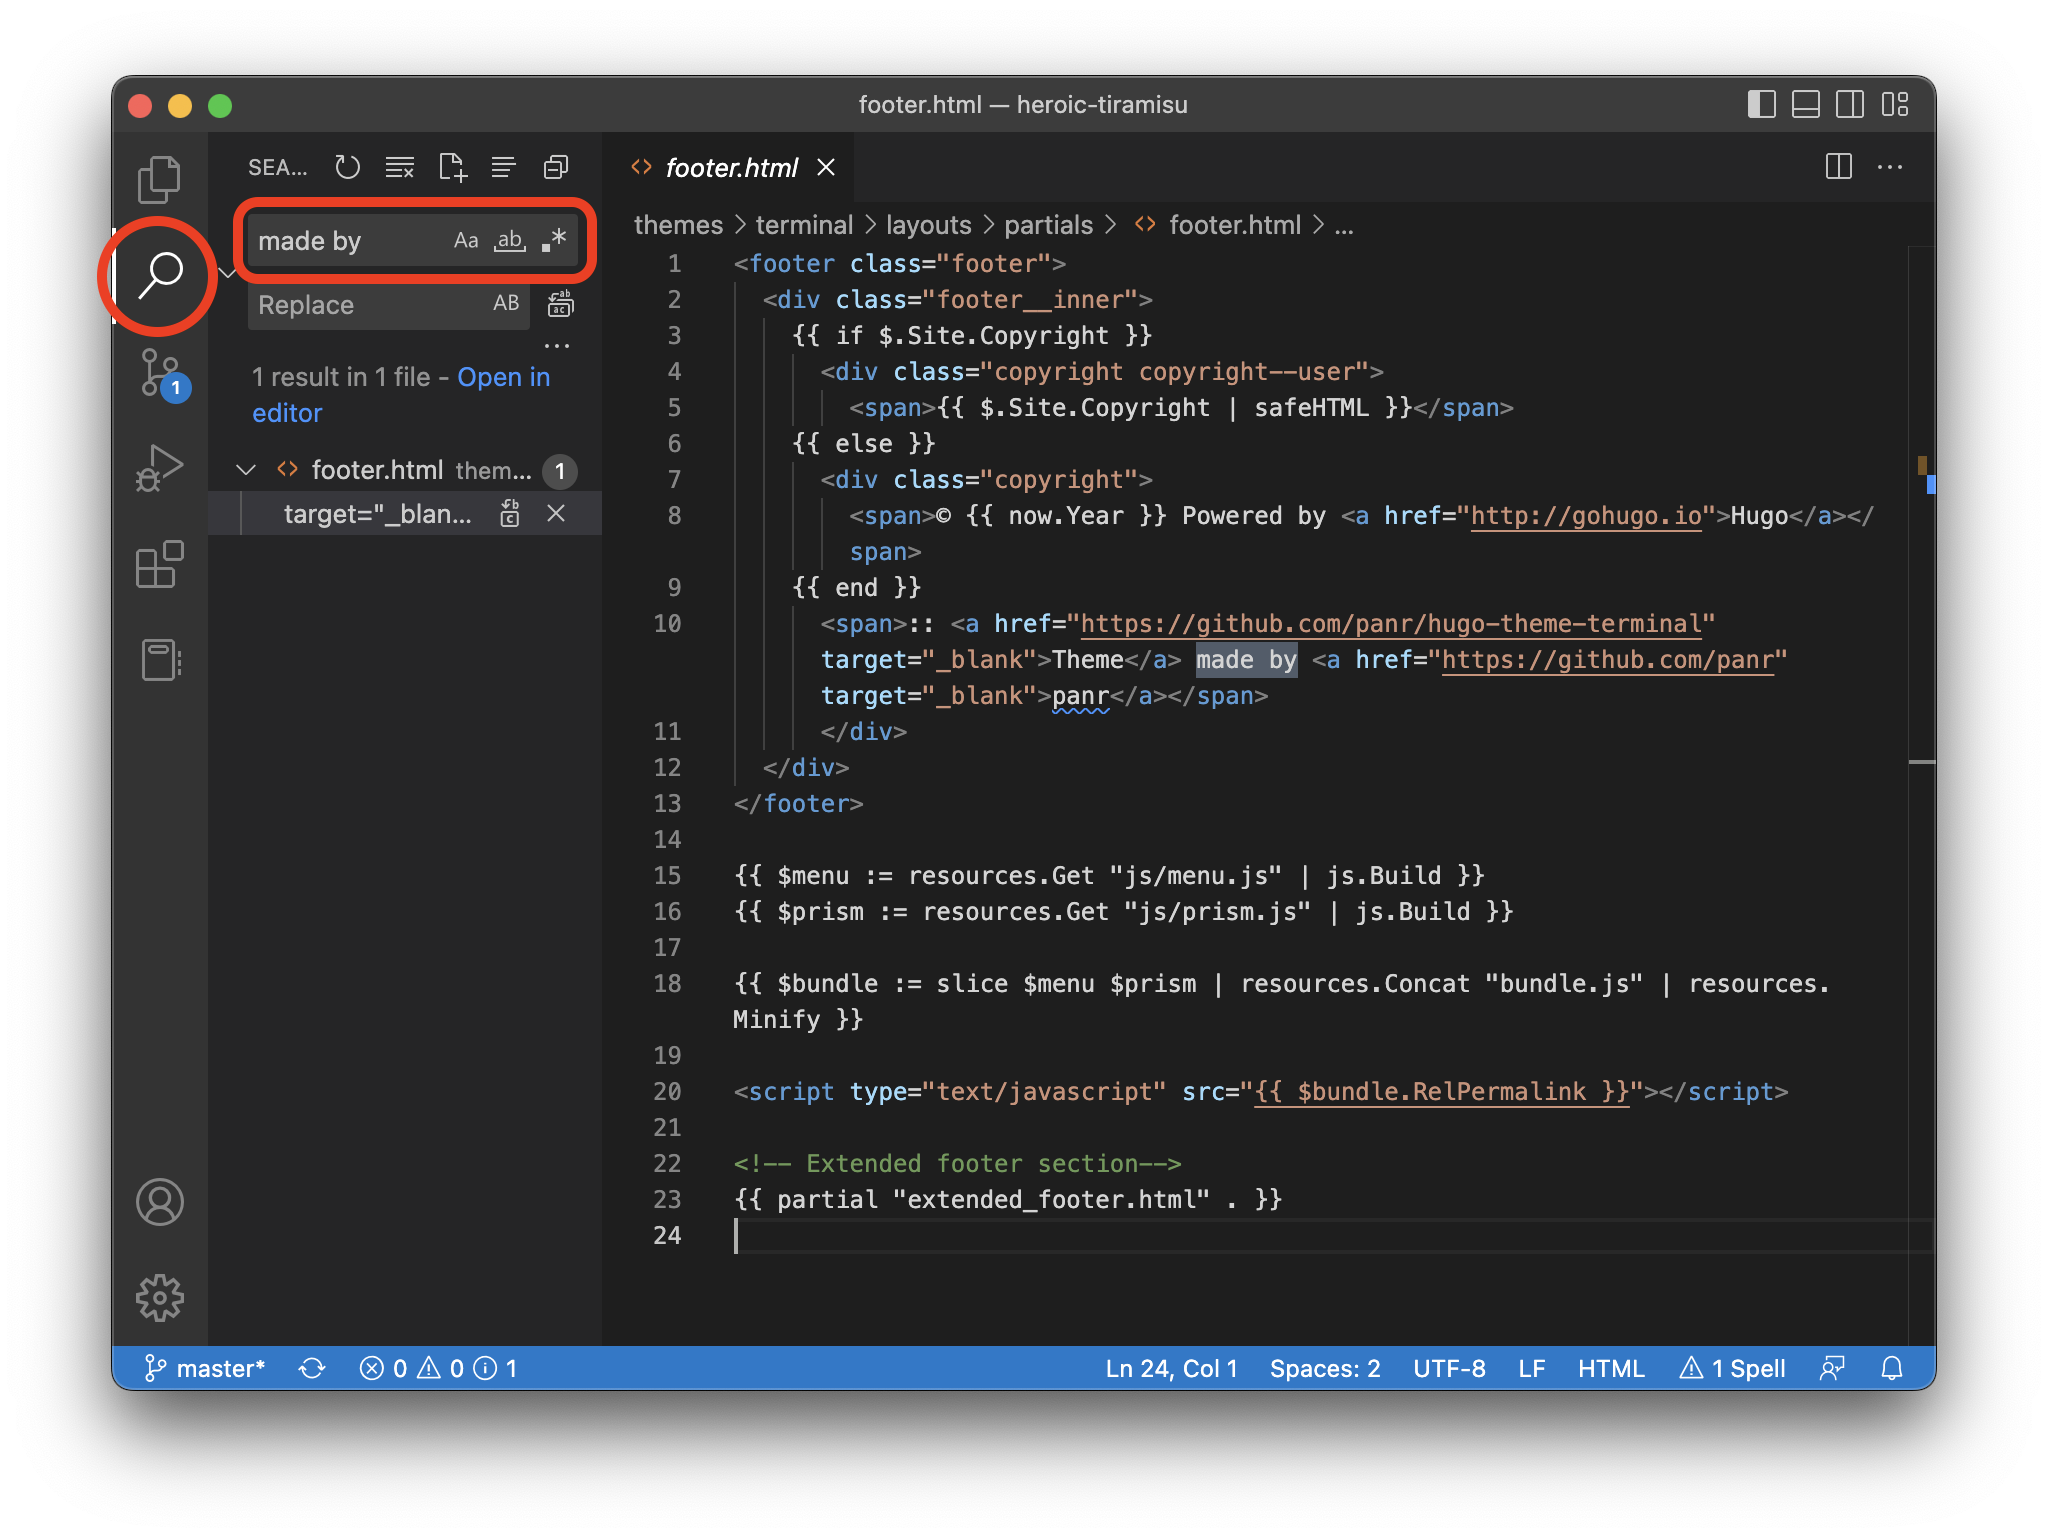
This is the file we need to edit. VS Code even highlighted the phrase we want to change—it’s there on line 10. See how it’s mostly HTML? You already know how to edit this! We’ll replace the existing content on line 10 with the following (feel free to modify it to suit your website):
<span>:: Made with 🌶️ in <a href="https://www.newmexico.org">New Mexico</a>.</span>
Let’s save the changes to the footer.html file and preview our website again. You know the drill by this point. If you left the Hugo server running in your terminal application, you can switch back to your web browser to see the updates—your web browser should have reloaded the changes automatically. You should see the updated footer at the bottom of the page, as shown below.
You just modified your instance of the Terminal theme. Now that you know how to modify the theme, you’re well on your way to making other changes!
Adding a New Color to the Theme
By many measures, the update to the footer was easy. We knew what we wanted to change. We searched for the phrase, found the relevant file, and modified a single line. But themes can be complicated, and it’s not always immediately apparent how to change something. In the future, making other modifications might prove more difficult.
Take the Terminal theme’s color options, for example. The theme provides several colors to choose from out of the box. We specify one of those colors in the config.toml file to automatically apply it to our website’s color palette—right now, we have it set to orange. But what if we want to add a custom color? A quick review of the Terminal theme’s documentation confirms that there’s no easy way to do that.
Remember what we discussed earlier about how it’s critically important to embrace curiosity with dogged determination? This is a perfect example of that. Maybe you’re in a position where you need to use a custom color. If you can’t figure out a way to add the custom color to the Terminal theme, you might have to switch to a different theme and start the process of customization all over again.
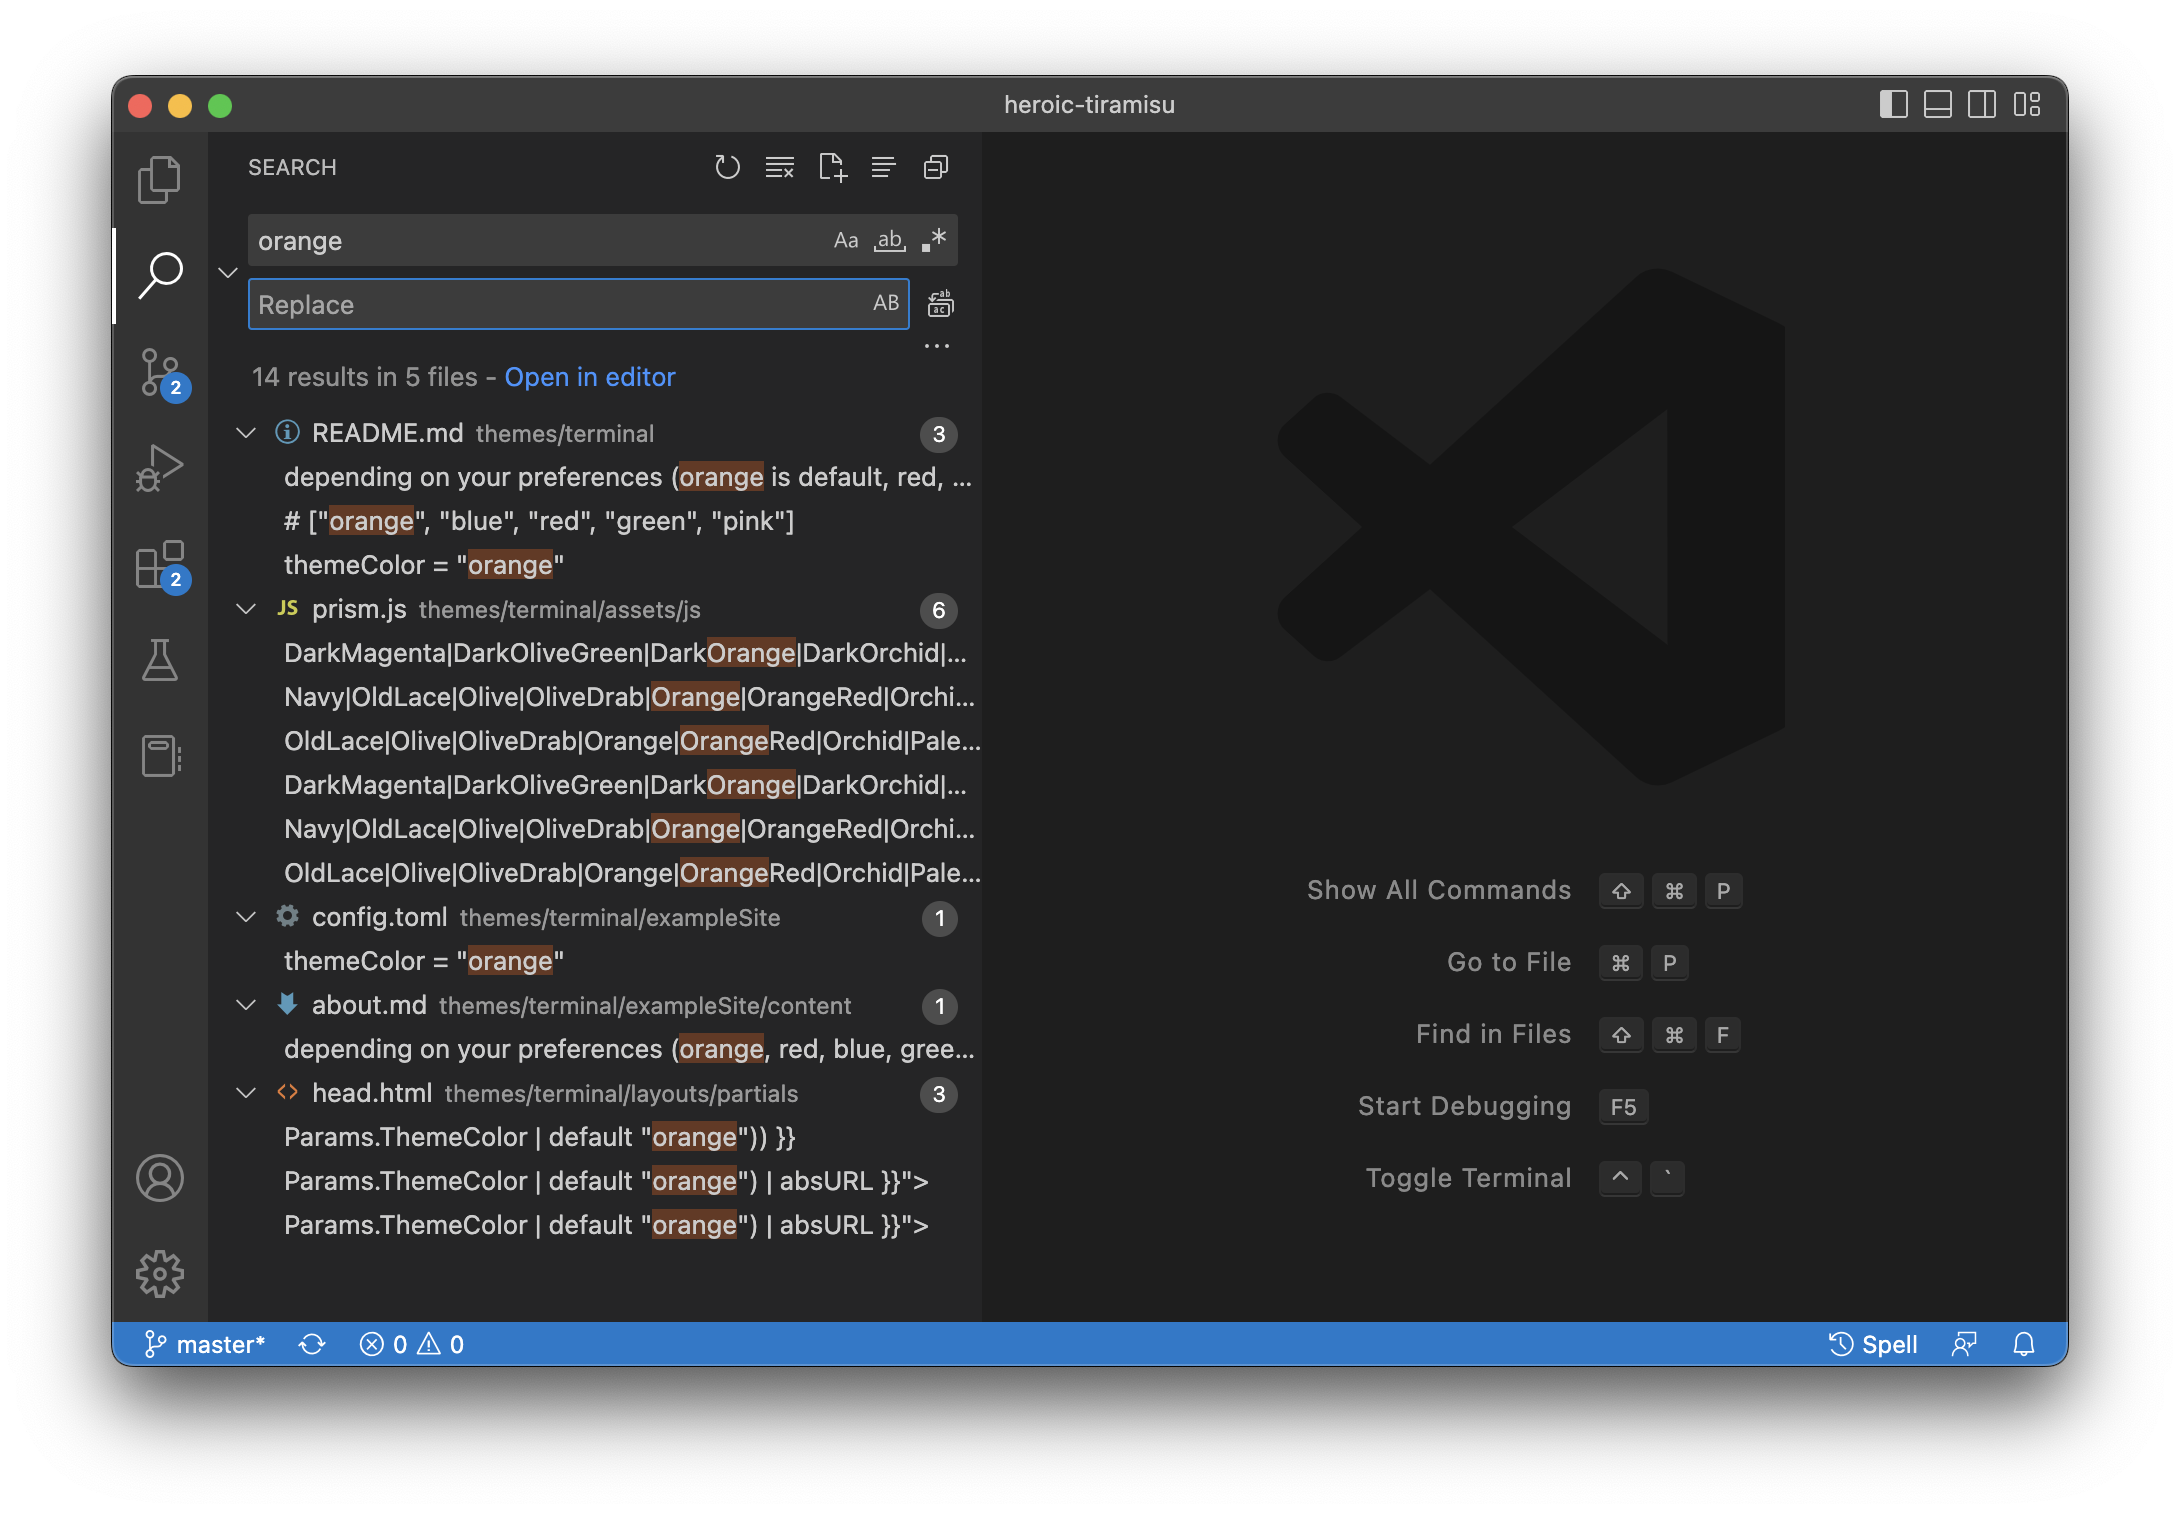
As it turns out, there is a way to add a custom color to this theme, but we’ll need to figure out how to do it on our own. Let’s start by using VS Code’s search feature again. We can search for one of the color names—I’ll search for orange, which is the default color for this theme. There are several search results, as shown below.
How do we know which file to look at? If you were working on this alone, without my help, you’d have a couple ways of going about this. You could open every file, one by one, and inspect the contents for clues. That’s not a bad idea. You could probably eliminate most, if not all, of the files based on what you already know about HTML and CSS.
However, a better approach might be pausing to consider what mechanism is being used to set the color. We learned earlier that the color for HTML elements can be specified in CSS. That’s probably what’s happening here. Initially, I assumed that the color was being specified in CSS, but none of the search results are CSS files. Then I realized that the theme might be passing a variable to the CSS file.
I opened the heroic-tiramisu/themes/terminal/layouts/partials/head.html file to have a look. This file contains the HTML that appears at the beginning of all of our web pages. That’s relevant to the issue at hand, because CSS is specified between the <head></head> tags. I saw the following code in head.html, starting on line 10:
{{ $defaultStyles := resources.Get "css/style.scss" }}
<!-- Local Theme Variables -->
{{ if and (isset .Params "color") (not (eq .Params.color "")) }}
  {{ $localColorCss := resources.Get (printf "css/color/%s.scss" .Params.color) }}
  {{ $localCss := slice $localColorCss $defaultStyles | resources.Concat (printf "css/%s-local.scss" .Params.color) }}
  {{ $localColorStyles := $localCss | resources.ToCSS }}
  <link rel="stylesheet" href="{{ $localColorStyles.Permalink }}">
{{ else }}
  <!-- Theme Variables -->
  {{ $colorCss := resources.Get (printf "css/color/%s.scss" ($.Site.Params.ThemeColor | default "orange")) }}
  {{ $css := slice $colorCss $defaultStyles | resources.Concat "css/base.scss" }}
  {{ $options := (dict "targetPath" "styles.css" "outputStyle" "compressed" "enableSourceMap" true "precision" 6 "includePaths" (slice "node_modules")) }}
  {{ $styles := $css | resources.ToCSS $options }}
  <link rel="stylesheet" href="{{ $styles.Permalink }}">
{{ end }}
If you’re scratching your head and thinking you’ve never seen anything that looks quite like this, you’re right. You’re looking at code written in the Go templating language. The syntax is a bit odd, so I don’t expect you to understand any of it. But I did highlight one of the lines above—take a look at that one. This line holds the key to the custom color puzzle.
The code is taking the value of the ThemeColor parameter we set in our config.toml file and printing it into a file path to load a file. The printf "css/color/%s.scss" bit provides us with a clue. The first part (css/color/) is the directory path, and the %s.scss bit is a file name where the %s is the name of the color we set for themeColor parameter.
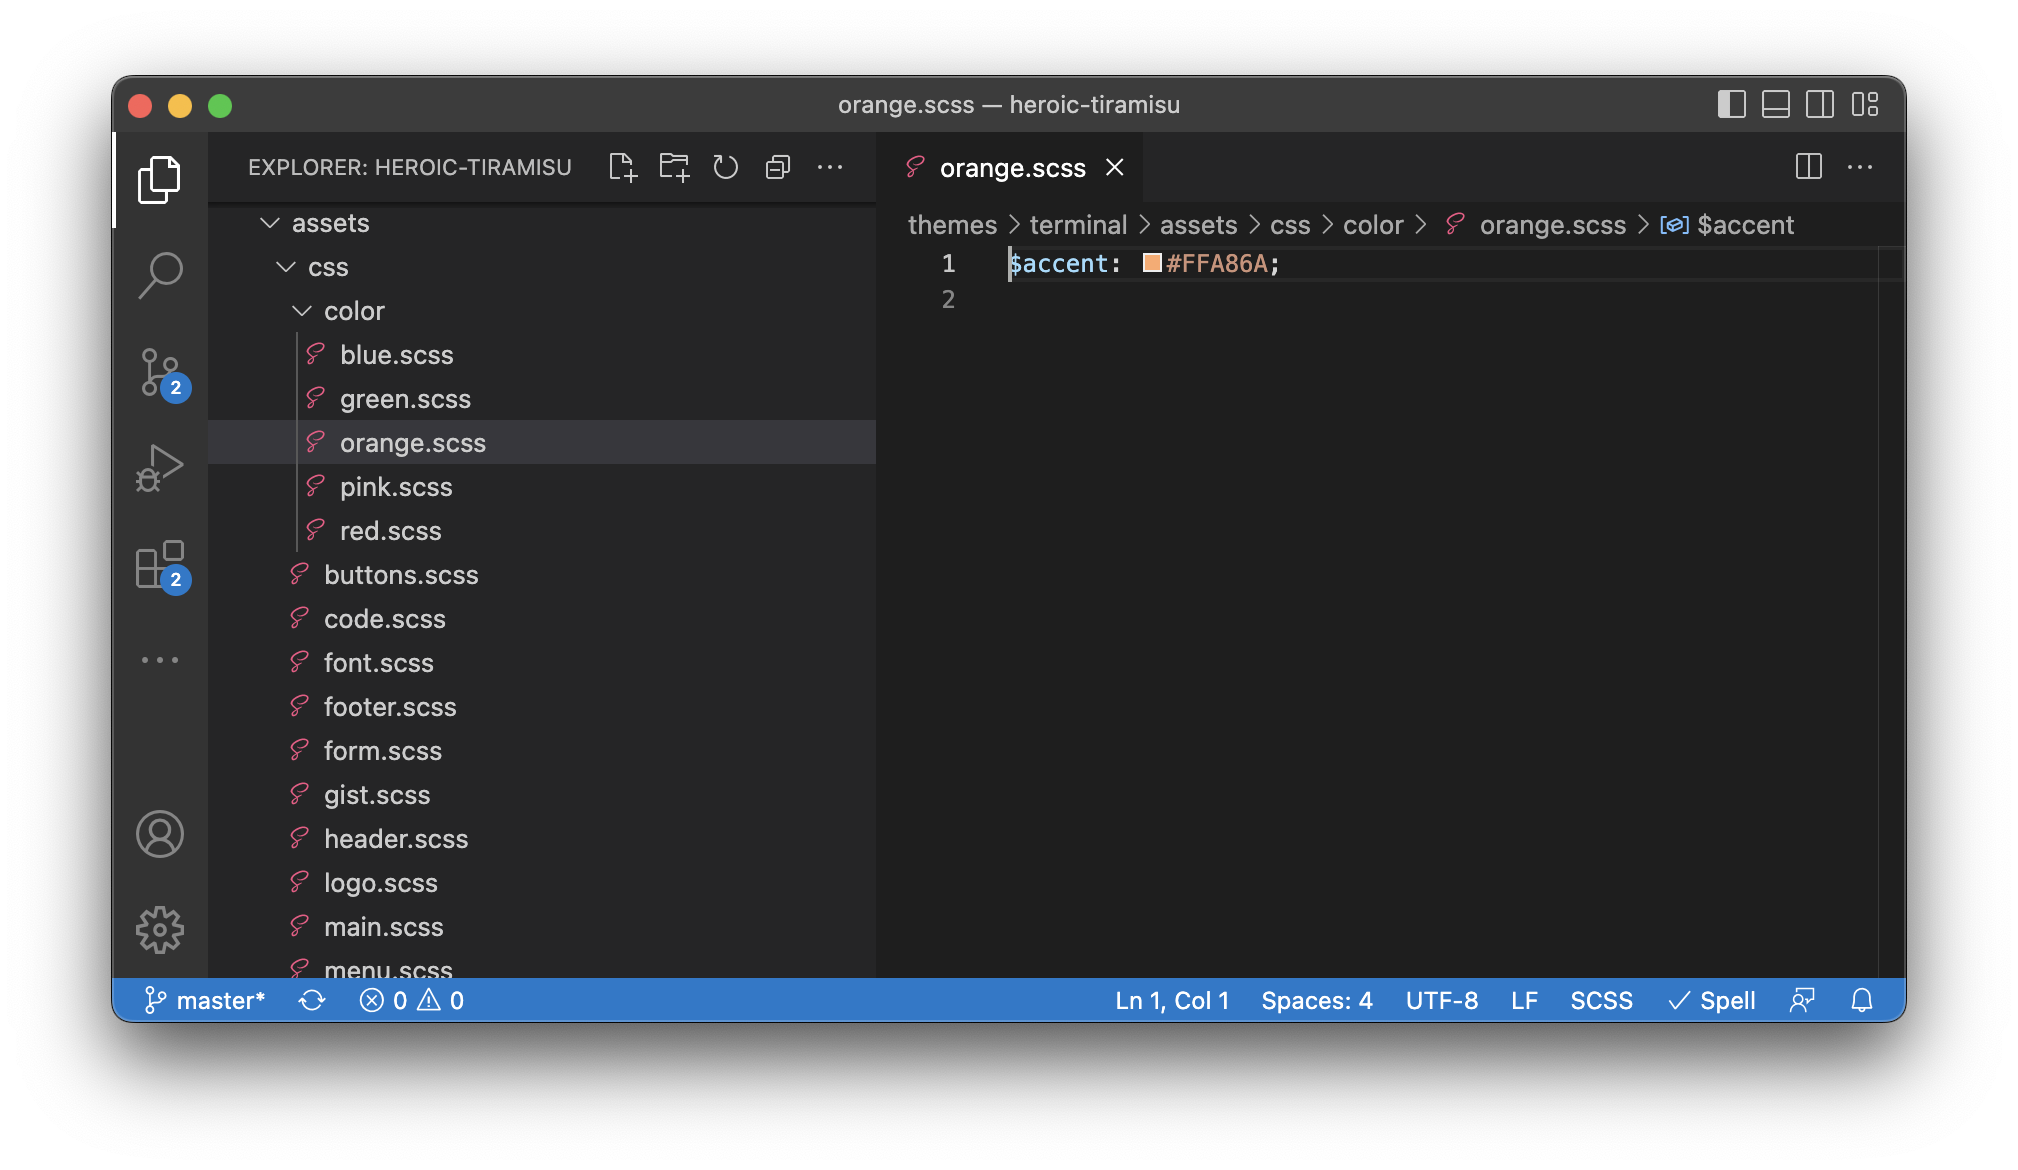
Let’s look in the directory. The css/color path is relative to the fully-built website, so if you were working on your own, without my help, you’d have to do a bit of sleuthing to find the directory. In this case, I’ll just give the correct path: heroic-tiramisu/themes/terminal/assets/css/color. Sure enough, there are CSS files in that directory for each of the Terminal theme’s default colors, as shown below. Each file contains the color’s hex code.
Now we can guess how the theme’s color system works. The user specifies a color using the themeColor parameter in the config.toml file, the head.html reads the value of the themeColor parameter, and then writes it into the path to a file with the same name as the color specified in heroic-tiramisu/themes/terminal/assets/css/color.
Assuming this is true, the way to add a custom color is to create a new file with the name of the custom color in heroic-tiramisu/themes/terminal/assets/css/color and then set the themeColor parameter to the name of that custom color. Let’s try that now.
Using VS Code, create a new file in heroic-tiramisu/themes/terminal/assets/css/color and name it turquoise.scss. Copy and paste the following content, which contains the hex code for the color turquoise, into the file:
$accent: #40E0D0;
Save the changes to the turquoise.scss file. Now open the config.toml file and set the themeColor parameter to turquoise, as shown below.
baseURL = "/"
languageCode = "en-us"
theme = "terminal"
paginate = 5

[params]
  contentTypeName = "posts"
  themeColor = "turquoise"
  showMenuItems = 1
  fullWidthTheme = false
  centerTheme = true

[languages]
  [languages.en.params]
    languageName = "English"
    title = "Heroic Tiramisu"
    subtitle = "A delicious example site for the Static Guide."
    owner = "Heroic Tiramisu"
    keywords = ""
    copyright = "© 2024 Heroic Tiramisu"
    menuMore = "Show more"
    readMore = "Read more"
    readOtherPosts = "Read other posts"
    newerPosts = "Newer posts"
    olderPosts = "Older posts"
    missingContentMessage = "Page not found..."
    missingBackButtonLabel = "Back to home page"

    [languages.en.params.logo]
      logoText = "Heroic Tiramisu"
      logoHomeLink = "/"

    [languages.en.params.menu]
      [[languages.en.menu.main]]
        identifier = "about"
        name = "About"
        url = "/about"
Now we can preview our website again. For a change this big that affects both the CSS and the configuration file of the website, we should stop and restart the Hugo server. If you left the Hugo server running in your terminal application, stop it by pressing both the Control and C keys on the keyboard. Then start it again by entering the following command:
hugo serve
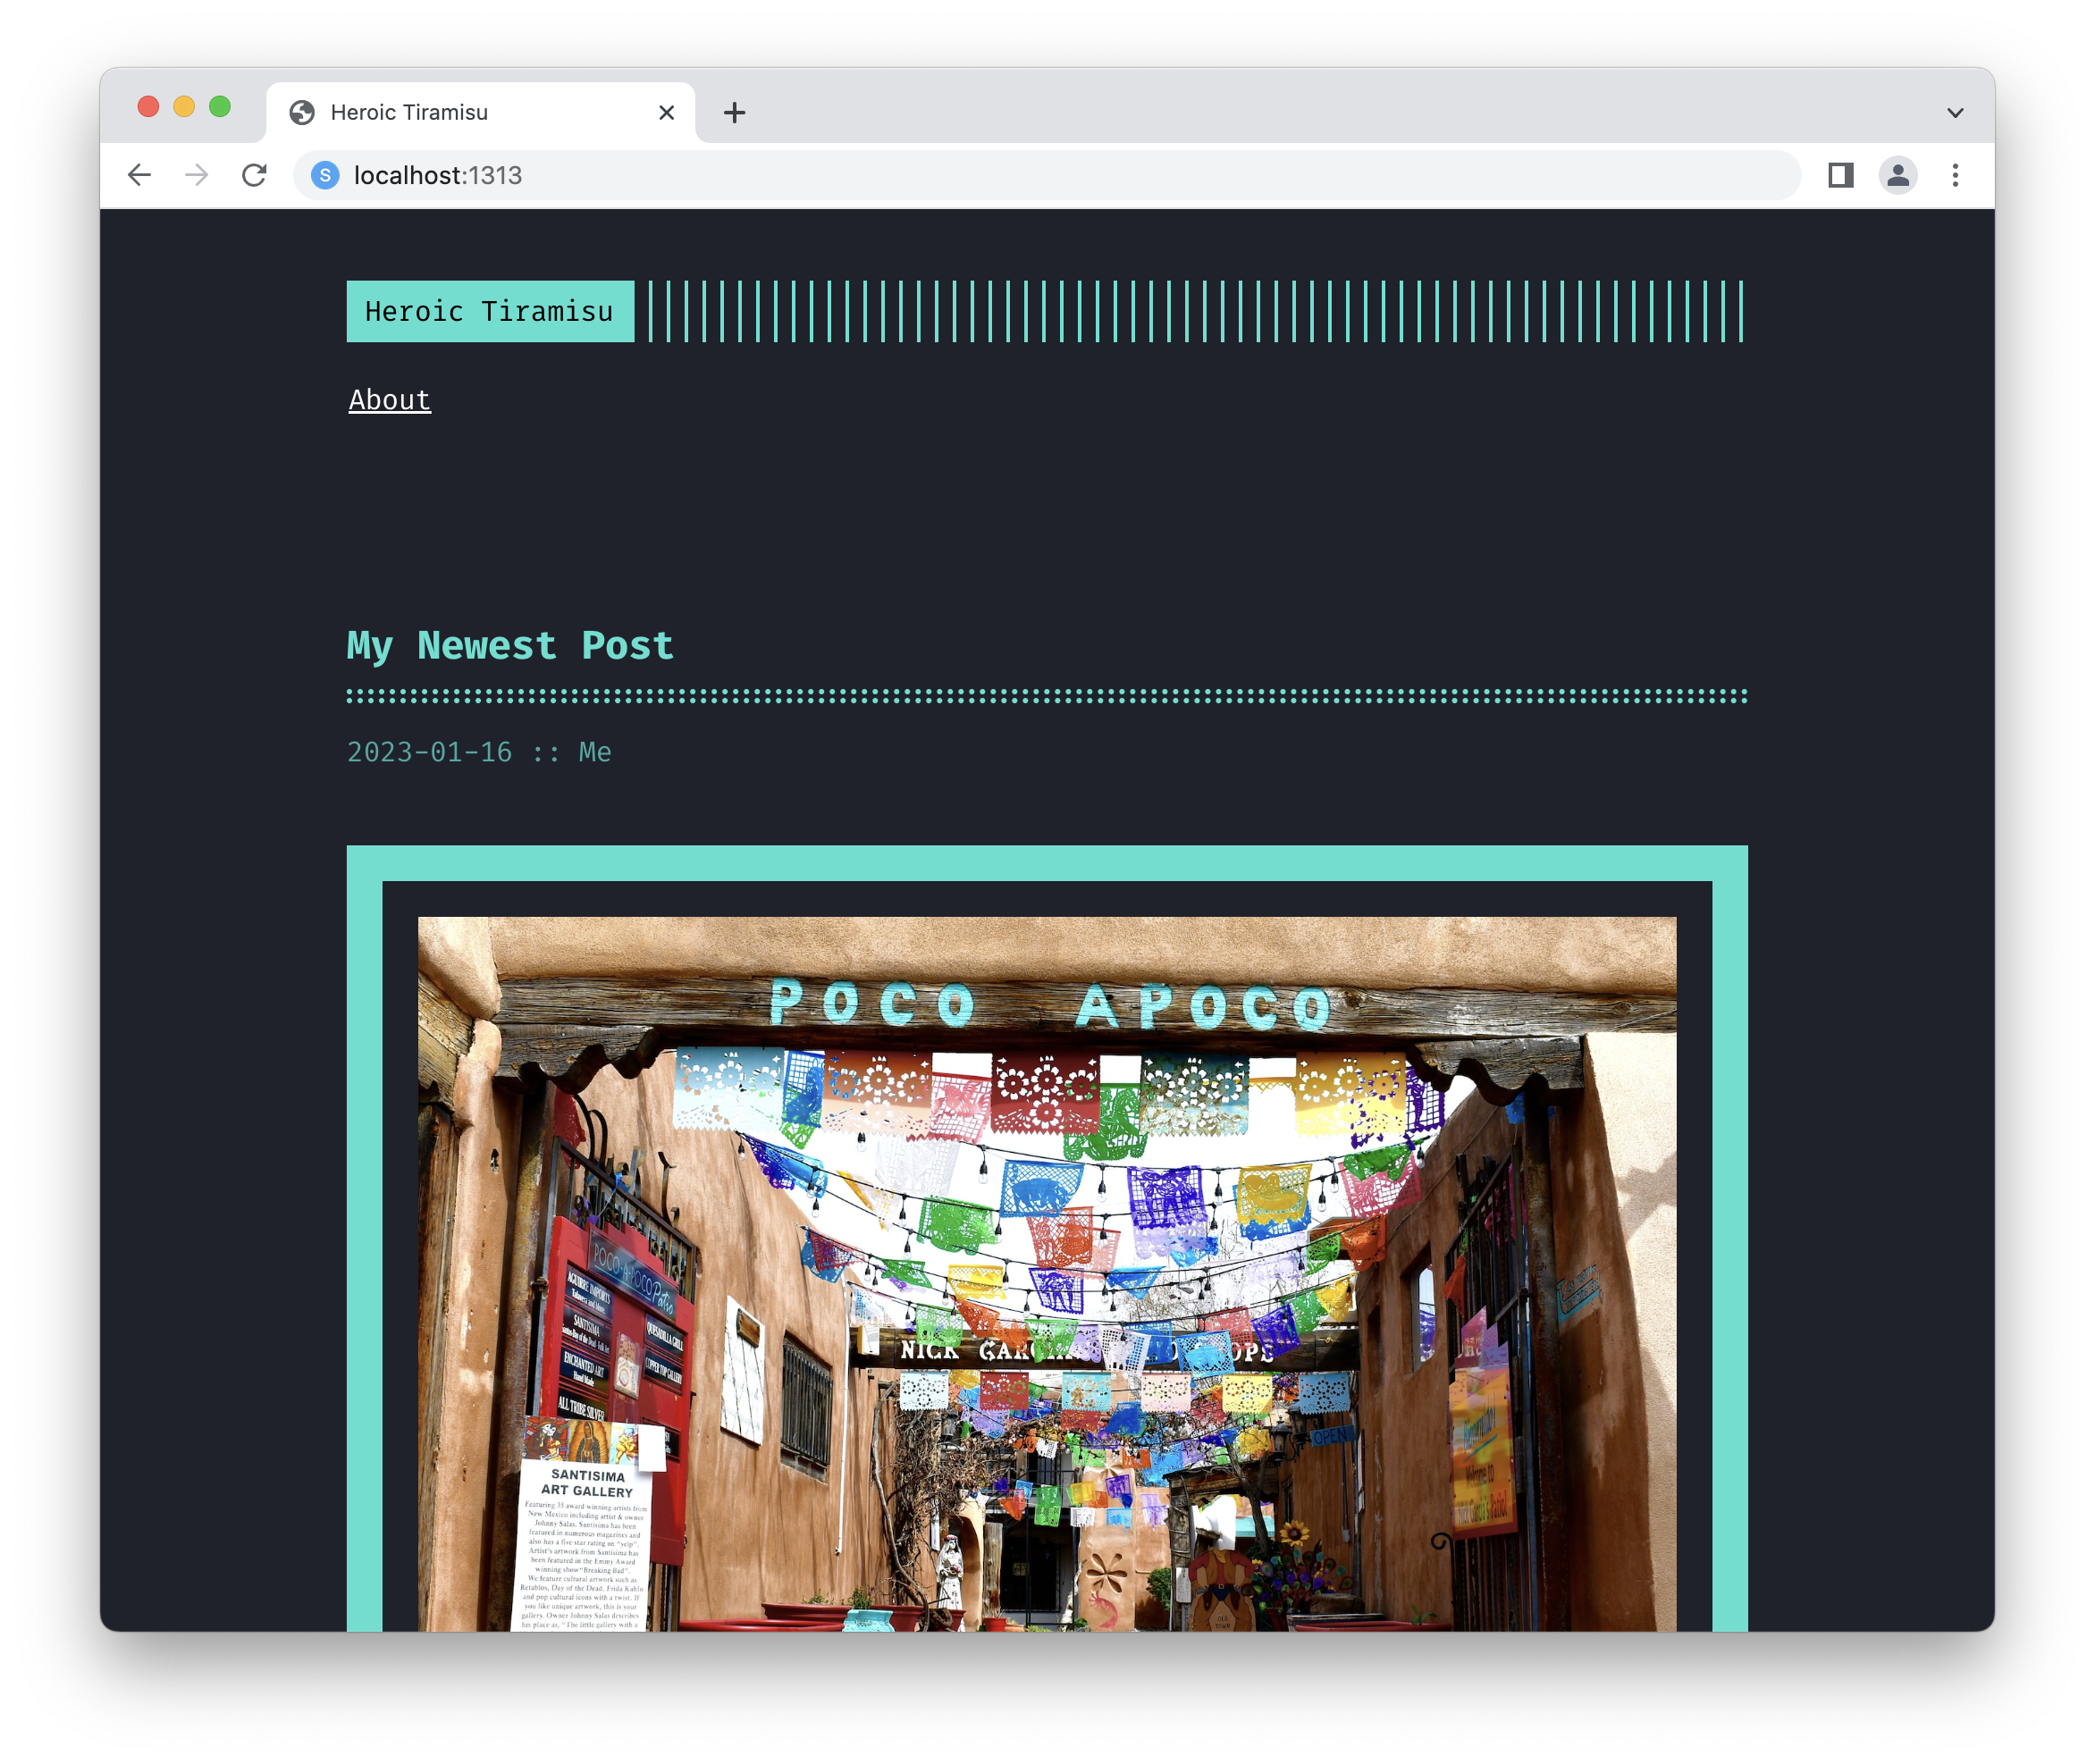
Now you can refresh the website in your web browser. You should see the turquoise color being used as the theme color, as shown below.
We did it. We successfully figured out how to add a new color to the theme, and then we added our own. This was a challenging puzzle. If you can figure out something like this, you can change virtually any part of the theme. The sky’s the limit!
Cleaning Up
There’s one housekeeping task we need to perform before building and uploading our website.
When we downloaded the Terminal theme to our computer, we also downloaded the theme’s example website. That contains a slew of files that we don’t want or need. Let’s delete those files now so they’re not permanently hosted on our public website.
I’ve compiled a list of files and directories that you should delete. You can remove these by using VS Code, a terminal application, or your operating system’s graphical user interface:
heroic-tiramisu/themes/terminal/exampleSite/heroic-tiramisu/themes/terminal/images/heroic-tiramisu/themes/terminal/COMMUNITY-FEATURES.mdheroic-tiramisu/themes/terminal/USERS.md
💡 Tip: If you use a different theme, you may find similar demo files you can safely remove before deploying your website.
Now we’re ready to build and upload our website to Netlify.
Building the Website
Let’s recap what we’ve done with Hugo so far. We’ve installed it on our computer using a terminal application and used it to create a new website. We’ve installed and customized a theme, created new content, and previewed our website using Hugo’s built-in server. Now we need to figure out how to get our website onto Netlify.
The first step is using Hugo to build our website. We can do this by entering a command in our terminal application. Hugo will take all of the assets in our website’s directory and build the website in a new directory. We can then drag and drop that directory onto the Netlify website, just like we did before.
If you left the Hugo server running in your terminal application, stop it by pressing both the Control and C keys on the keyboard. Then enter the following command to build the website:
hugo
If everything works, you should see the following output:
Start building sites …
hugo v0.128.0+extended darwin/arm64 BuildDate=2024-06-25T16:15:48Z VendorInfo=brew

                   | EN
-------------------+-----
  Pages            | 14
  Paginator pages  |  0
  Non-page files   |  0
  Static files     | 10
  Processed images |  0
  Aliases          |  2
  Cleaned          |  0

Total in 101 ms
Hugo built our website in heroic-tiramisu/public, as shown below. This directory contains our entire website—it’s the one we’ll upload to Netlify here in just a moment.
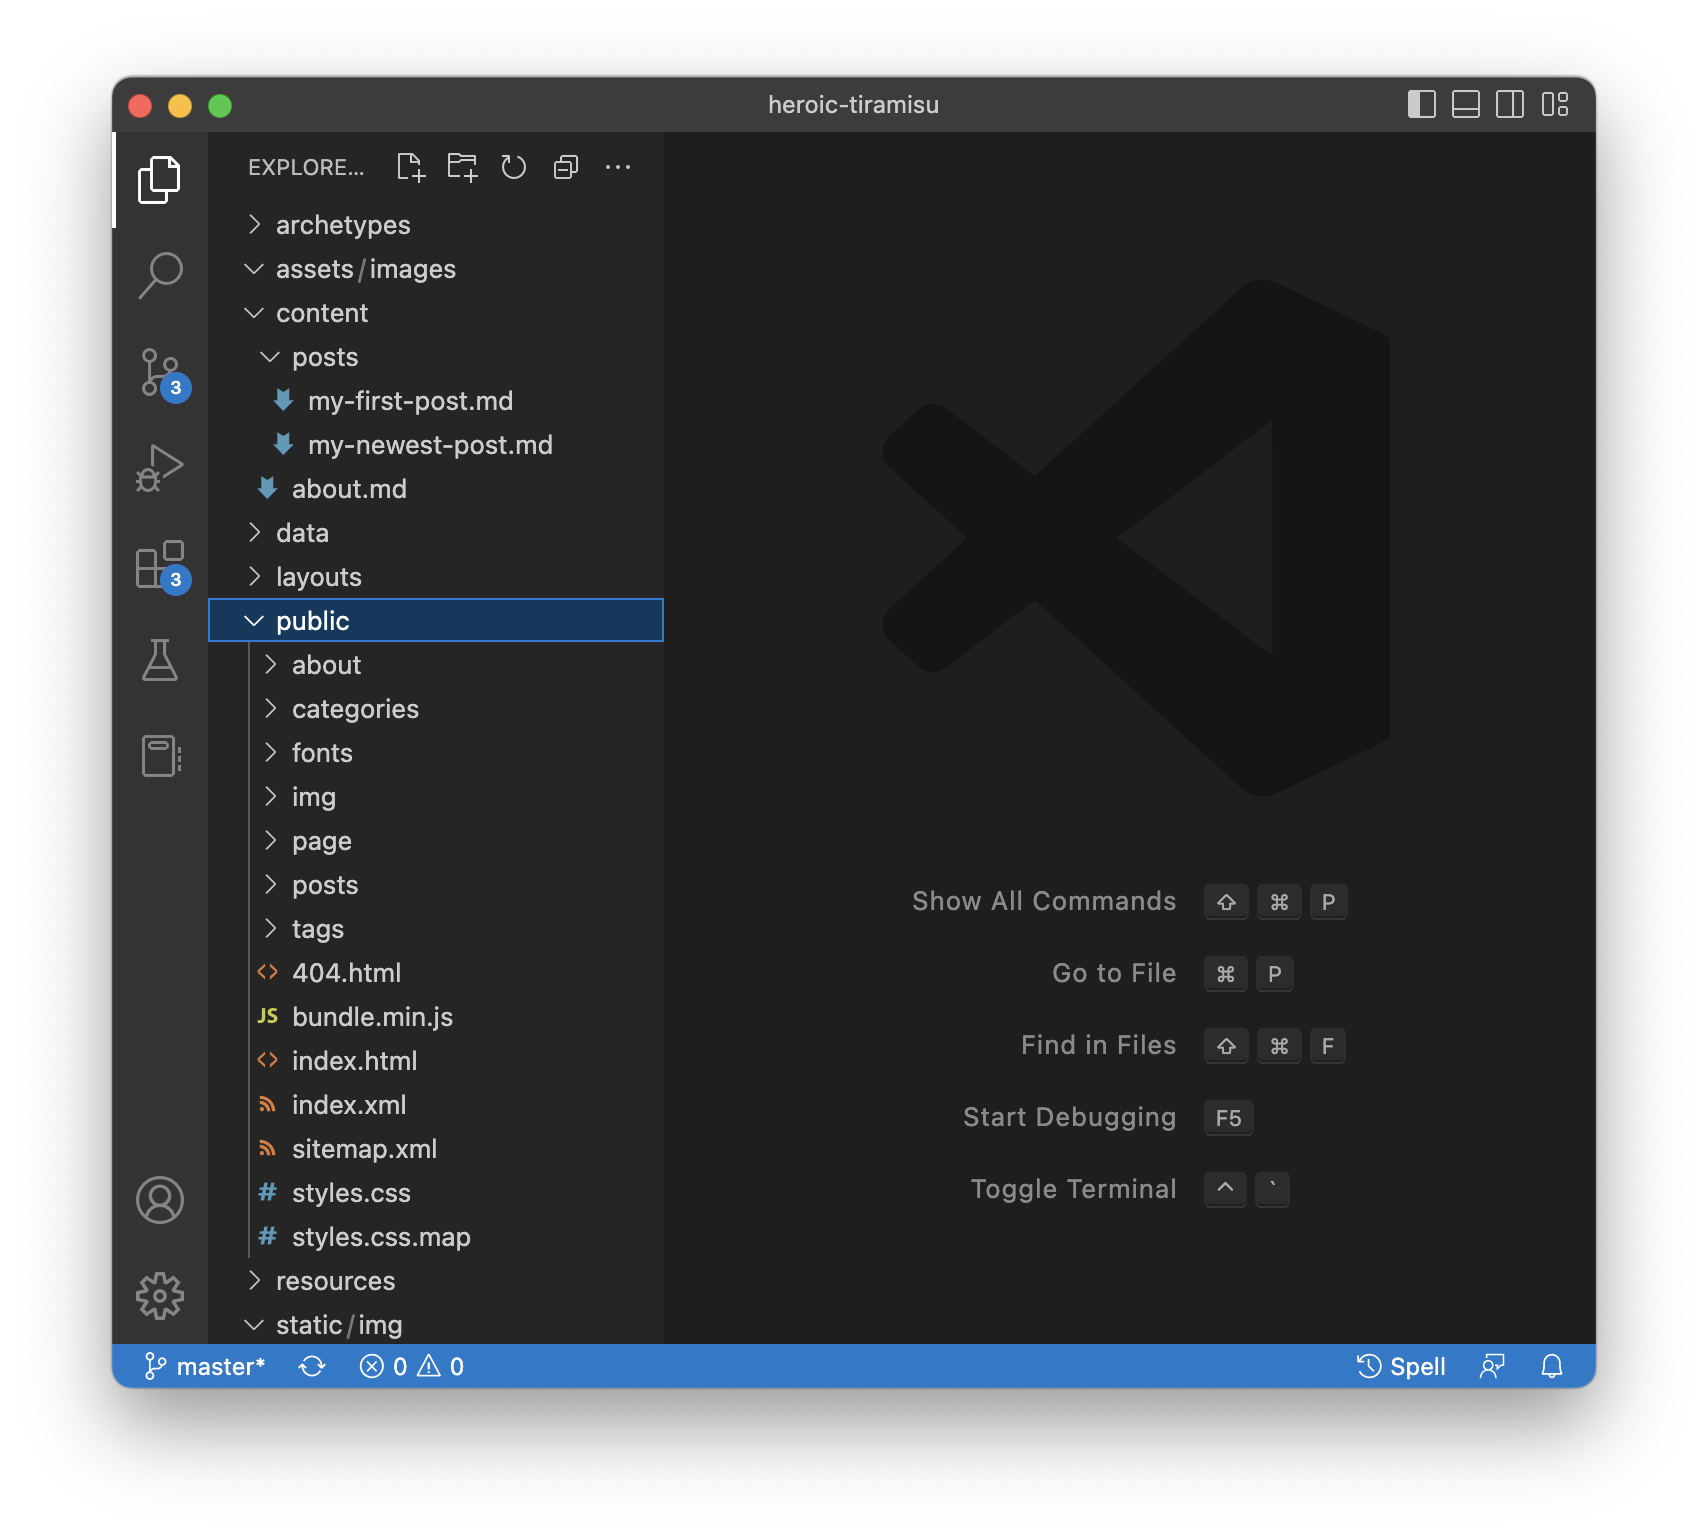
One word of warning: Don’t edit the files in heroic-tiramisu/public. You can poke around in this directory and open files up to see what Hugo did, but don’t modify them. Hugo will overwrite these files every time you build the website. If you want to change the content or modify the way the website looks, edit the Markdown files and the theme, not the files in heroic-tiramisu/public.
Uploading the Website
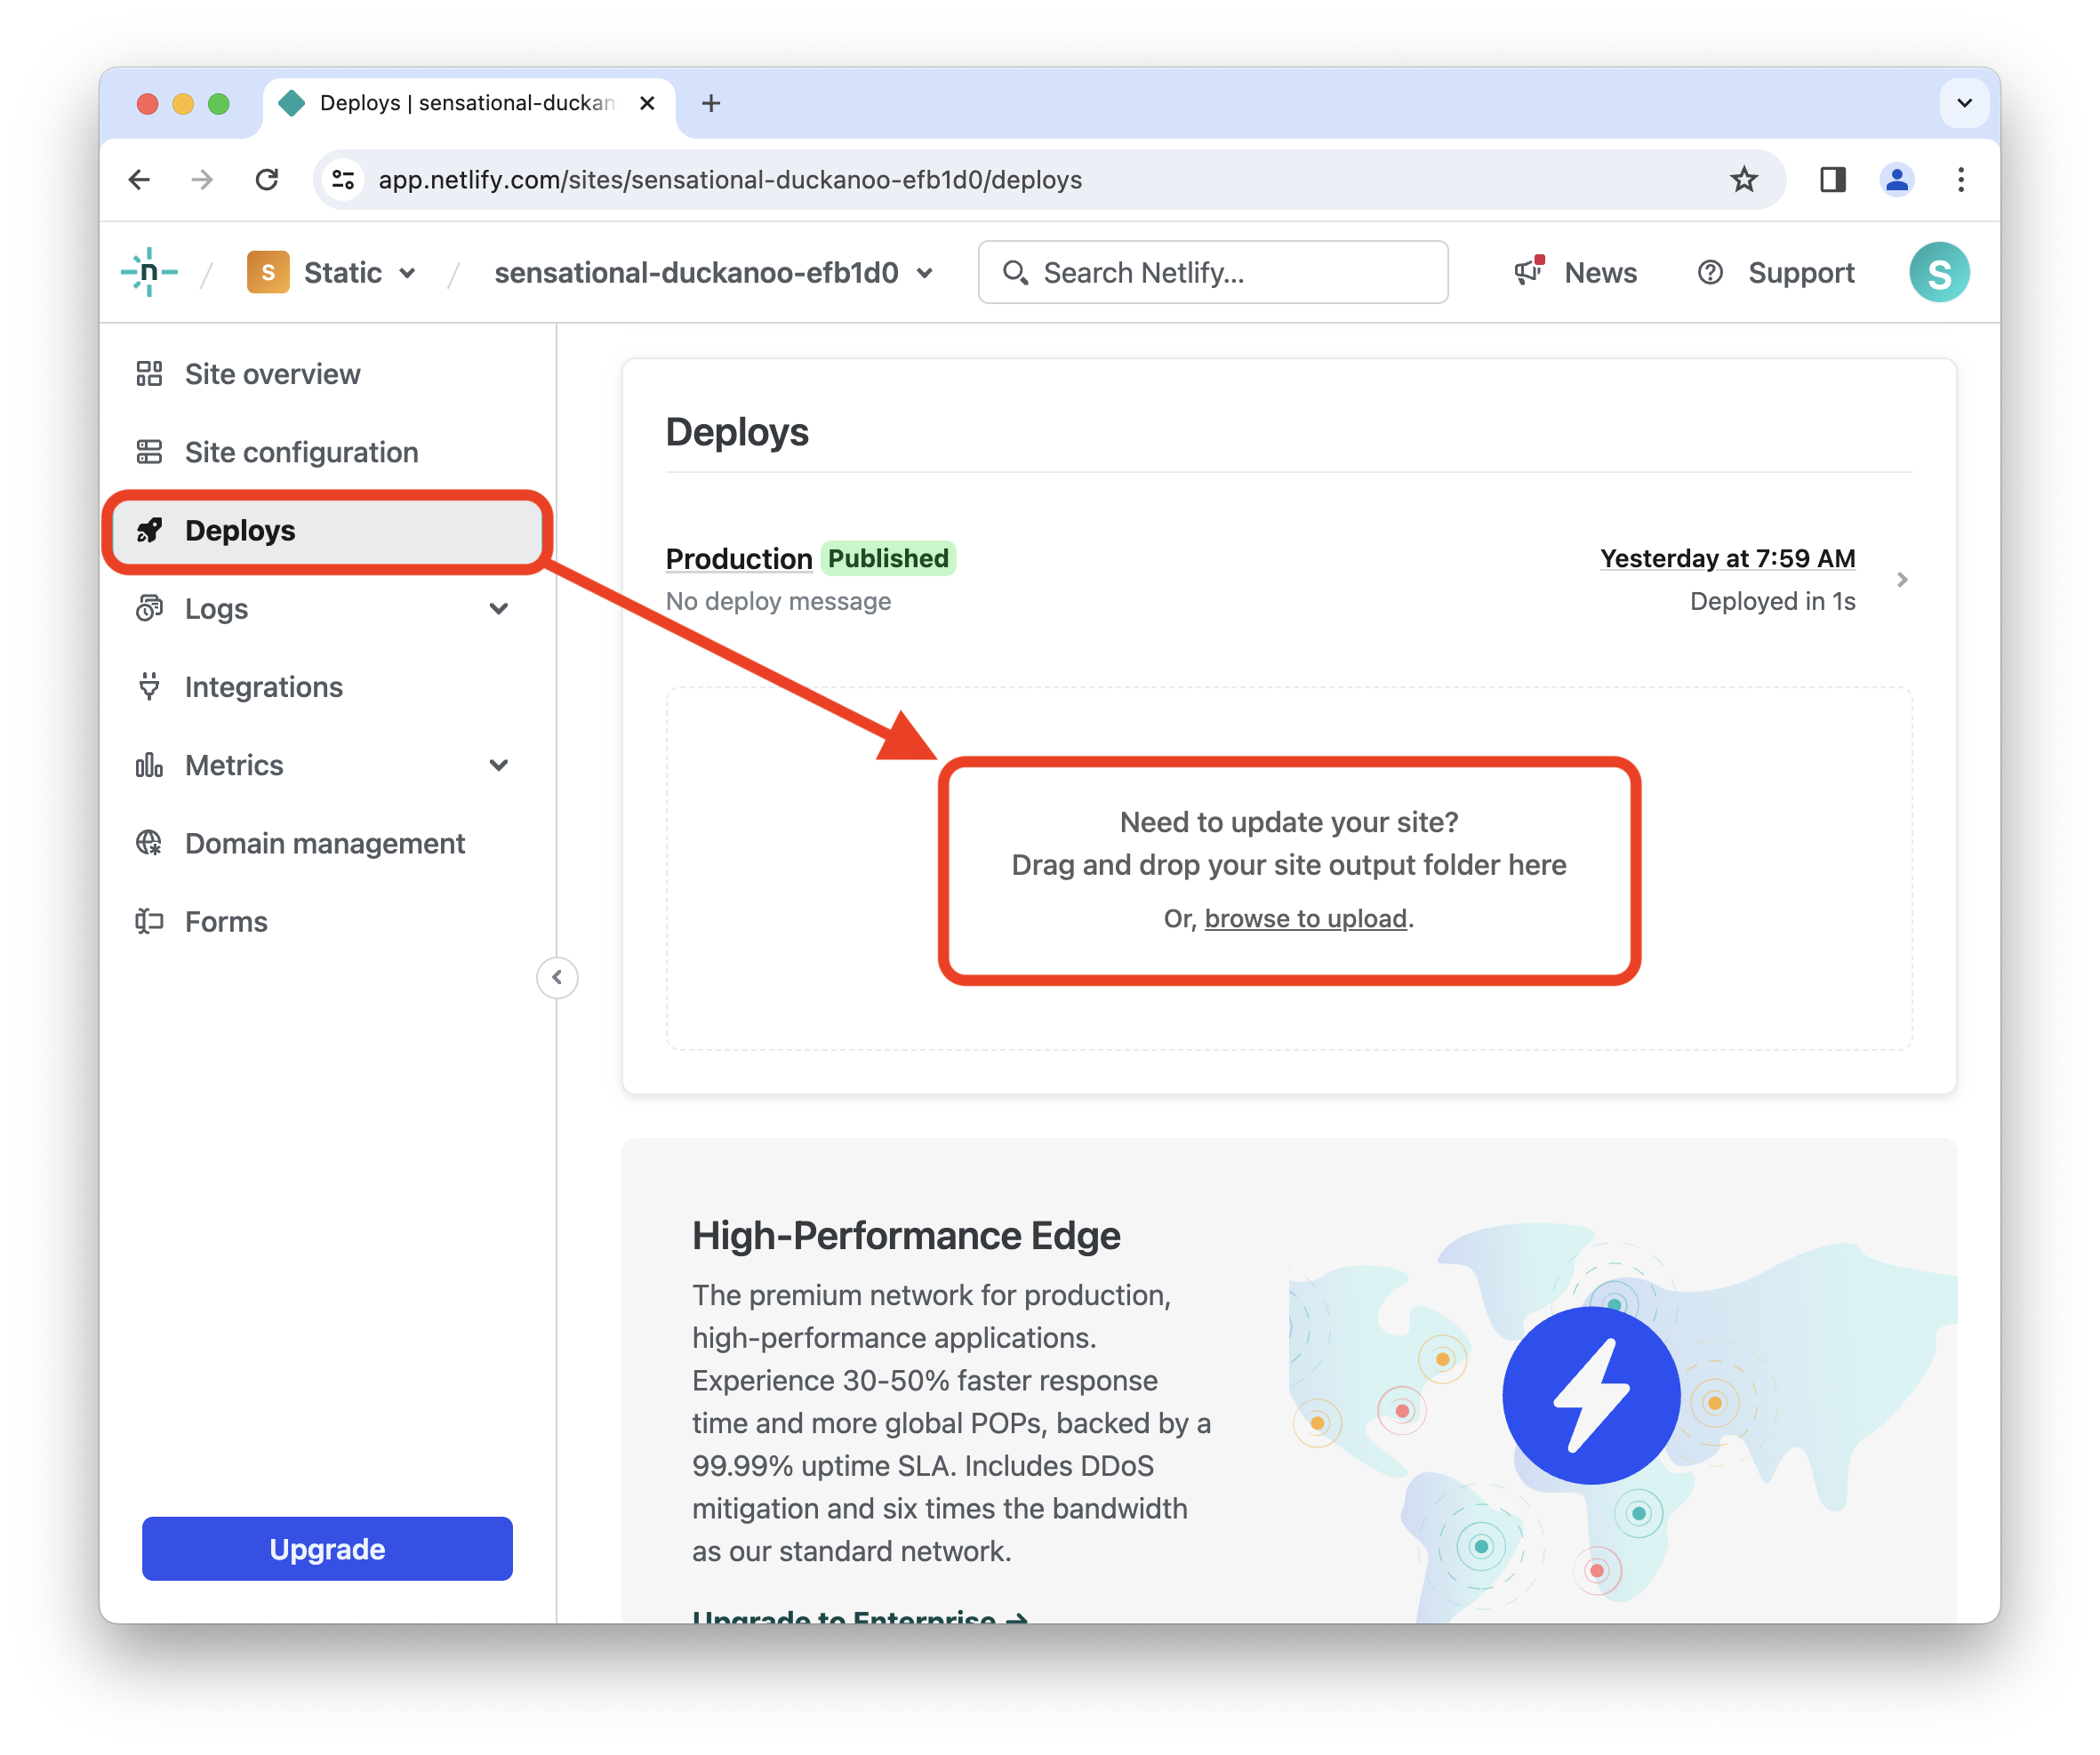
Now that our website is built, we can upload it to Netlify. The process is the same as it was with our first website. Log in to Netlify, click the Deploys link, and then drag and drop the heroic-tiramisu/public folder onto the box in the middle of the page, as shown below.
After Netlify uploads your website, type in your domain name to see your updated website. The updates have been published on the internet. You’ve successfully published your Hugo static site on Netlify!
💡 Tip: As a reminder, you can find the source code for the website we just created in the GitHub repository.
Keeping Hugo Updated
Hugo is maintained by a dedicated community of volunteers that releases updates periodically to add features and fix bugs. It’s important to keep Hugo updated so that you have the latest release on your computer.
If you’re using macOS, you can check for new updates by entering the following command:
brew update
If a Hugo update is available, you can install it by entering the following command:
brew upgrade hugo
If you’re using Windows, you can install a Hugo update by entering the following command:
winget update hugo.hugo.extended
Try to remember to run these commands every couple of weeks.