The Static Site Guide • Chapter 3
Sprucing Things Up
You’ve created a web page and published it on the internet, a major milestone! Now it’s time to do a bit more. Let’s add some images and CSS, then create another web page and link to it from our homepage.
Adding Images
No website would be complete without images. You’ve probably heard the expression “a picture is worth a thousand words.” That holds doubly true when it comes to images on websites. Images in articles, blog posts, and homepages can convey information and make websites more attractive. So it’ll probably come as no surprise that our next step will be to add images to our website.
Images are files, so they’ll need to be added to our website’s directory structure. Let’s create a new directory for our images now. We’re going to do a bit of future-proofing and create two directories at this point: A directory named assets, and another directory inside that one named images. The assets directory will eventually hold multiple directories.
Now our directory structure looks like this:
my-website
├── index.html
└── assets
    └── images
Now we can add some images! Fortunately, I have two creative children at home who create royalty-free artwork for me. I’ll add one of their images to the images directory. Now our directory structure looks like this:
my-website
├──index.html
└── assets
    └── images
        └── hero.png
💡 Tip: If you’re looking for high-quality images that you can use for free, I recommend checking out Unsplash.
We can add an image to our website by using the img HTML tag as follows:
<img src="assets/images/hero.png" width="500px" alt="A slice of heaven">
Now the code for index.html looks like this:
<html>
    <head>
        <title>My first web page</title>
    </head>
    <body>
        <h1>Hello, world!</h1>
        <p>This is my first web page. It doesn't look like much (yet).</p>
        <p>Stay tuned!</p>
        <img src="assets/images/hero.png" width="500px" alt="A slice of heaven">
    </body>
</html>
💡 Tip: Did you notice that the new line is highlighted in the code sample above? From now on, when we add code to existing files, I’ll highlight the new lines so you can see exactly where the new lines have been added.
The img tag contains a relative path to the image file to tell the web browser where the image is located in our directory structure. Using relative paths is considered a best practice. Relative paths don’t contain the domain name, so the images will load locally or on whatever server we happen to upload our website to. If we had hard-coded the domain in the path (e.g., https://sensational-duckanoo-efb1d0.netlify.app/assets/images/hero.png), the image would load after we uploaded our website to Netlify, but not before.
Our img tag has a couple of other attributes too. The width attribute controls the width of our image in the web browser. This particular image has pretty big dimensions, so the width attribute will help fit it into the web browser. The alt attribute contains a written description of our image. Search engines use this to categorize our image, and screen readers use this to make the image accessible.
Now let’s open our website in our web browser again. We’ll see that the image has loaded, as shown below.
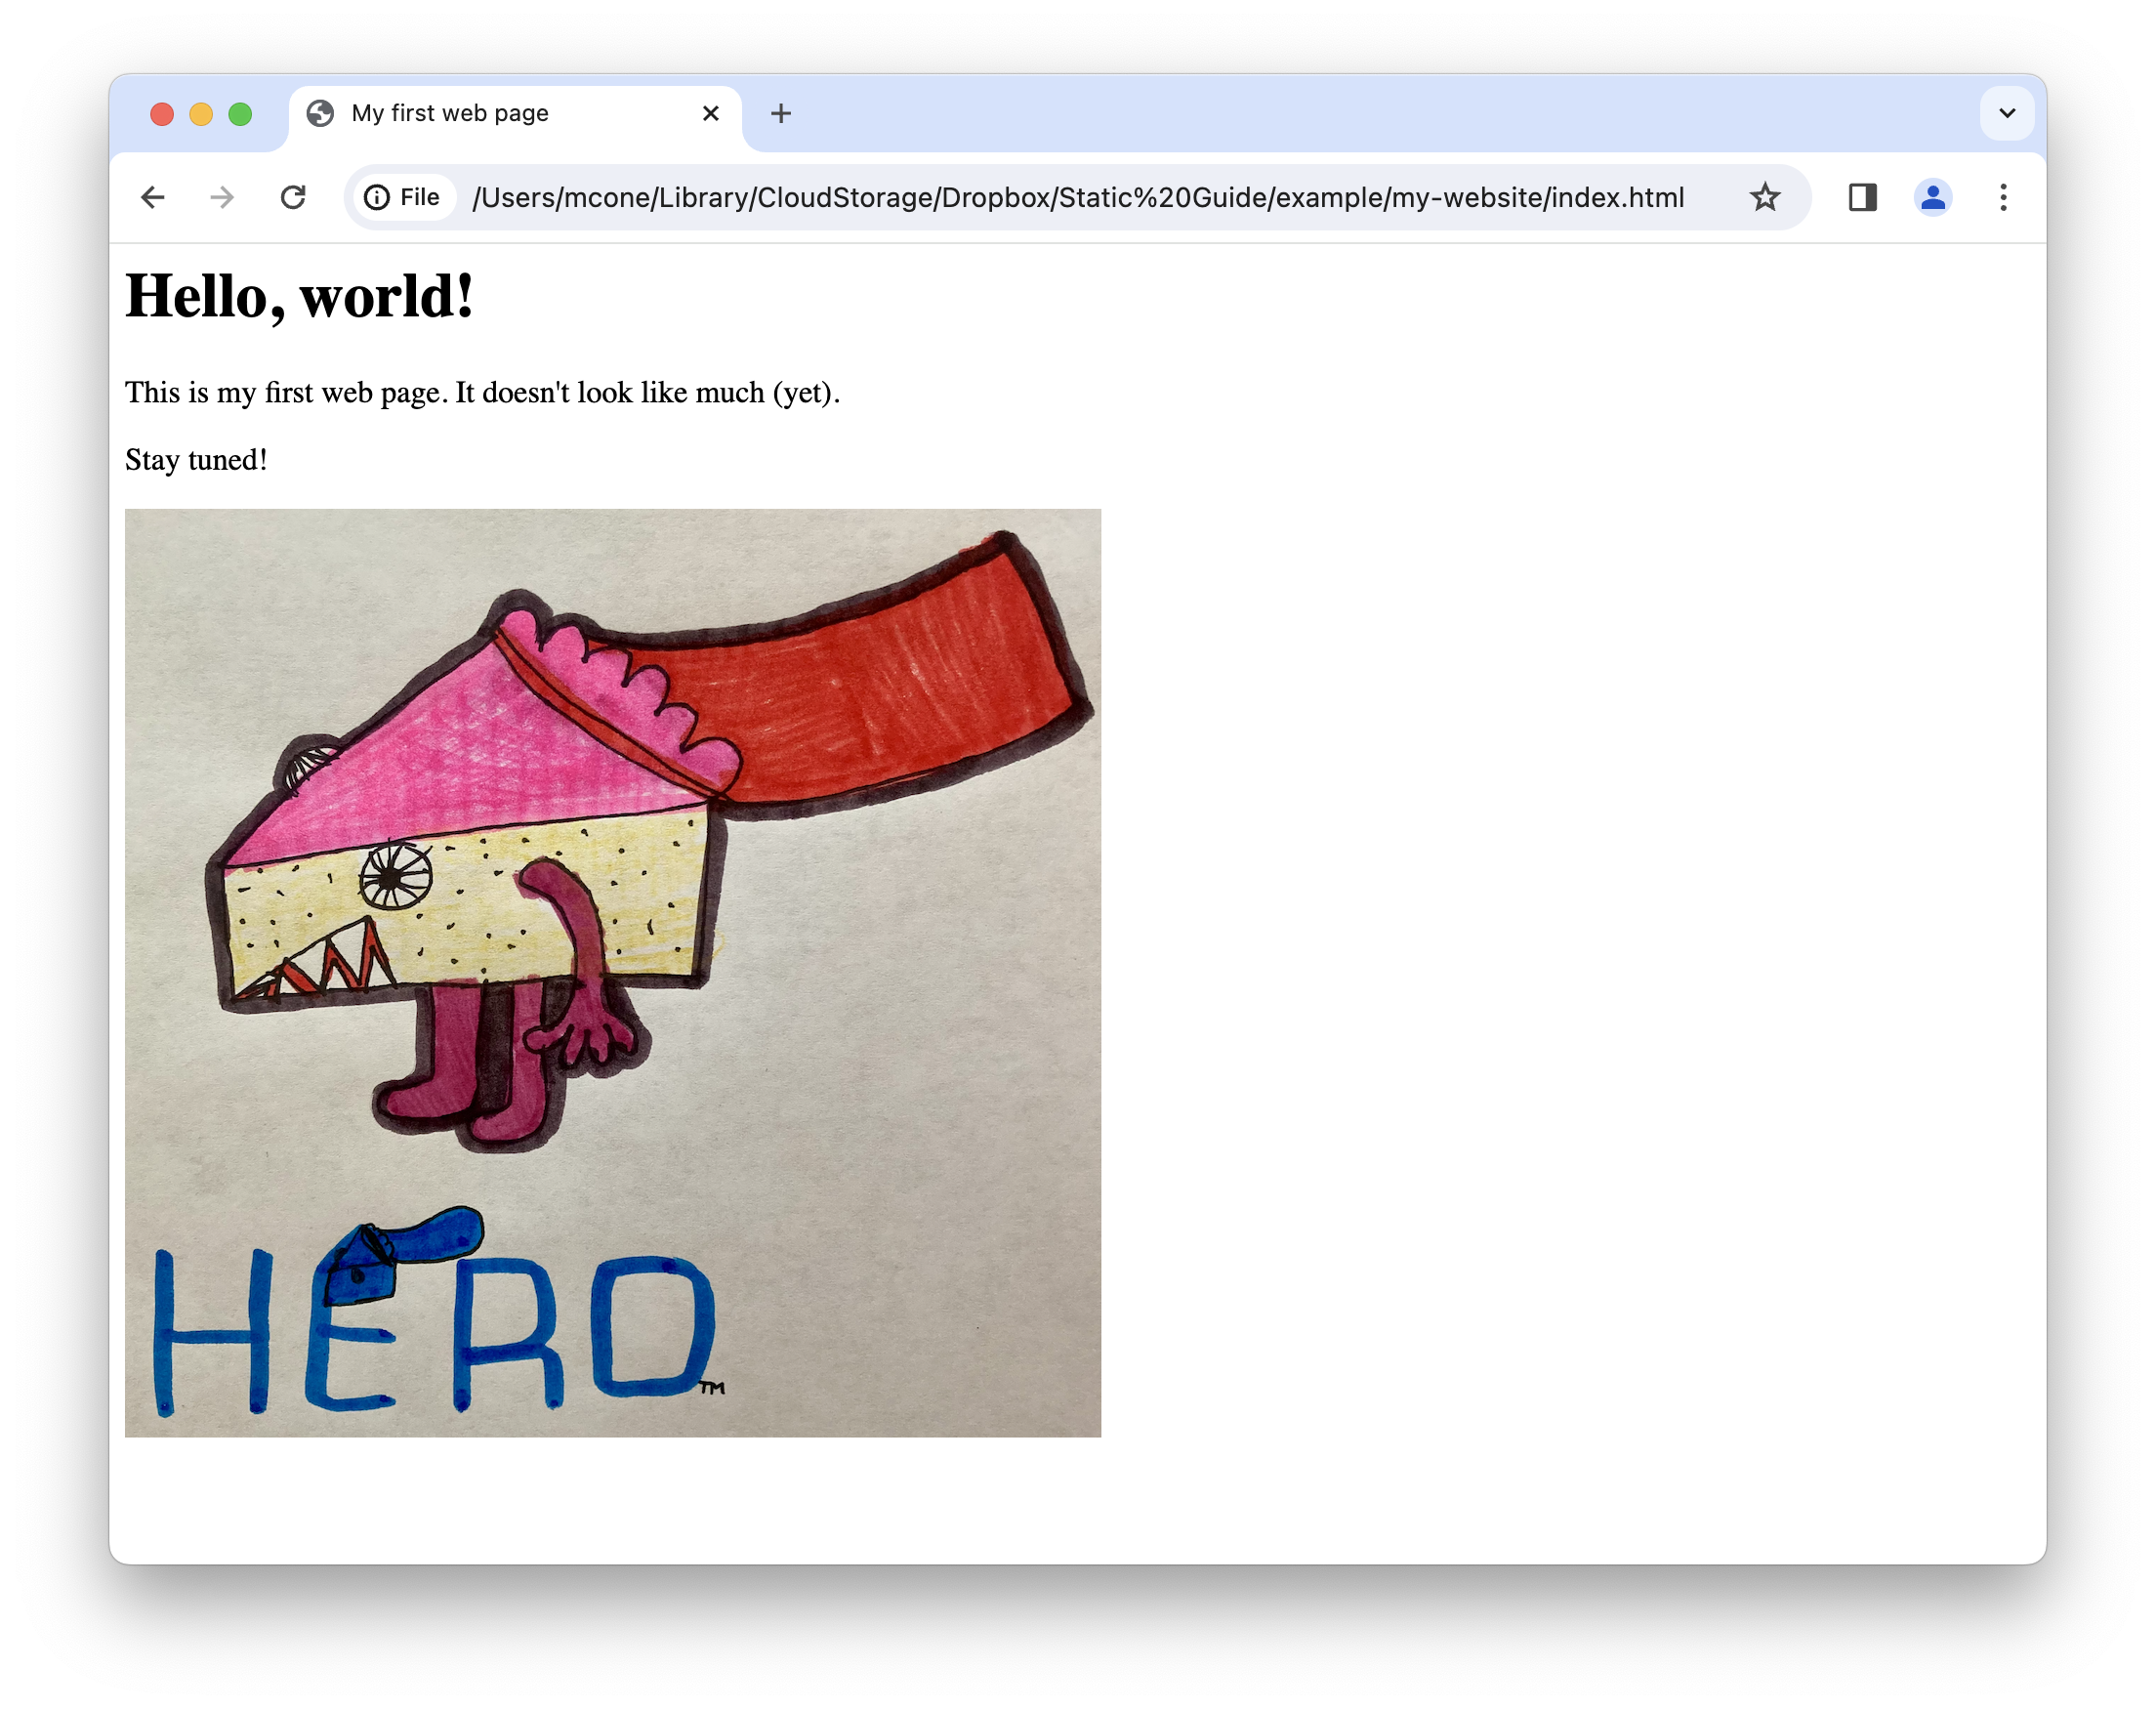
Nice work! Our website is coming along!
Experimenting With CSS
We know how to add text and images to our web page, and we can even publish it online. But there are some gaps in our knowledge. We’d start bumping up against some hard limits if we tried to change the presentation of our content right now. For instance, changing the font, size, or color of the text is virtually impossible using only HTML tags. To make changes like these, we’ll need to use Cascading Style Sheets (CSS).
CSS is a language that controls the presentation of content. You can use CSS to modify every aspect of how elements appear on a web page. Think of CSS as a layer that sits on top of your HTML. The HTML file contains the content for your web page, and the CSS file contains the presentation instructions. In this way, we can keep the content and presentation logically separated.
CSS is as big of a topic as HTML, but we can start small and implement some basic CSS styles now. Let’s take a look at how it works.
First, we’ll update our directory structure by creating a new css directory in assets. This directory will contain a new CSS file called main.css. As with HTML files, we can use a text editor to create and edit CSS files—they’re just plain text files. And like HTML files, the file extension (.css) of these files is important. Here’s what our directory structure looks like now:
my-website
├── index.html
└── assets
    ├── css
        └── main.css
    └── images
        └── hero.png
If you haven’t already created the css directory and the main.css file, do that now. Then, copy and paste the following code into main.css and save the changes:
body {
    font-family: "Helvetica";
    font-size: 23px;
    line-height: 1.4;
}

h1 {
    text-align: center;
}

p {
    text-align: center;
}
This is a basic example, but it gives you a taste of what CSS is capable of. We’re using three CSS rules to style HTML elements with element selectors that directly match an HTML element name. For example, h1 is an element selector that matches the h1 HTML element in our HTML file.
How will this CSS change the way our web page looks? Without looking at the web page in our web browser, we can guess by examining the corresponding styles. For example, we’re specifying that the h1 and p elements should be center aligned on the web page. And since the styles for body will apply to everything within the <body></body> tags, we’re effectively changing the font and the size of all the text.
The last thing we need to do is connect the main.css file to our index.html file so that the CSS loads with our web page. We can do this by adding the following line to our index.html in between the head HTML tags:
<link rel="stylesheet" href="assets/css/main.css">
Now the code for our index.html looks like this:
<html>
    <head>
        <title>My first web page</title>
        <link rel="stylesheet" href="assets/css/main.css">
    </head>
    <body>
        <h1>Hello, world!</h1>
        <p>This is my first web page. It doesn't look like much (yet).</p>
        <p>Stay tuned!</p>
        <img src="assets/images/hero.png" width="500px" alt="A slice of heaven">
    </body>
</html>
Let’s save the changes to index.html and then open our website in our web browser again. We’ll see that the CSS has improved the presentation of our web page, as shown below.
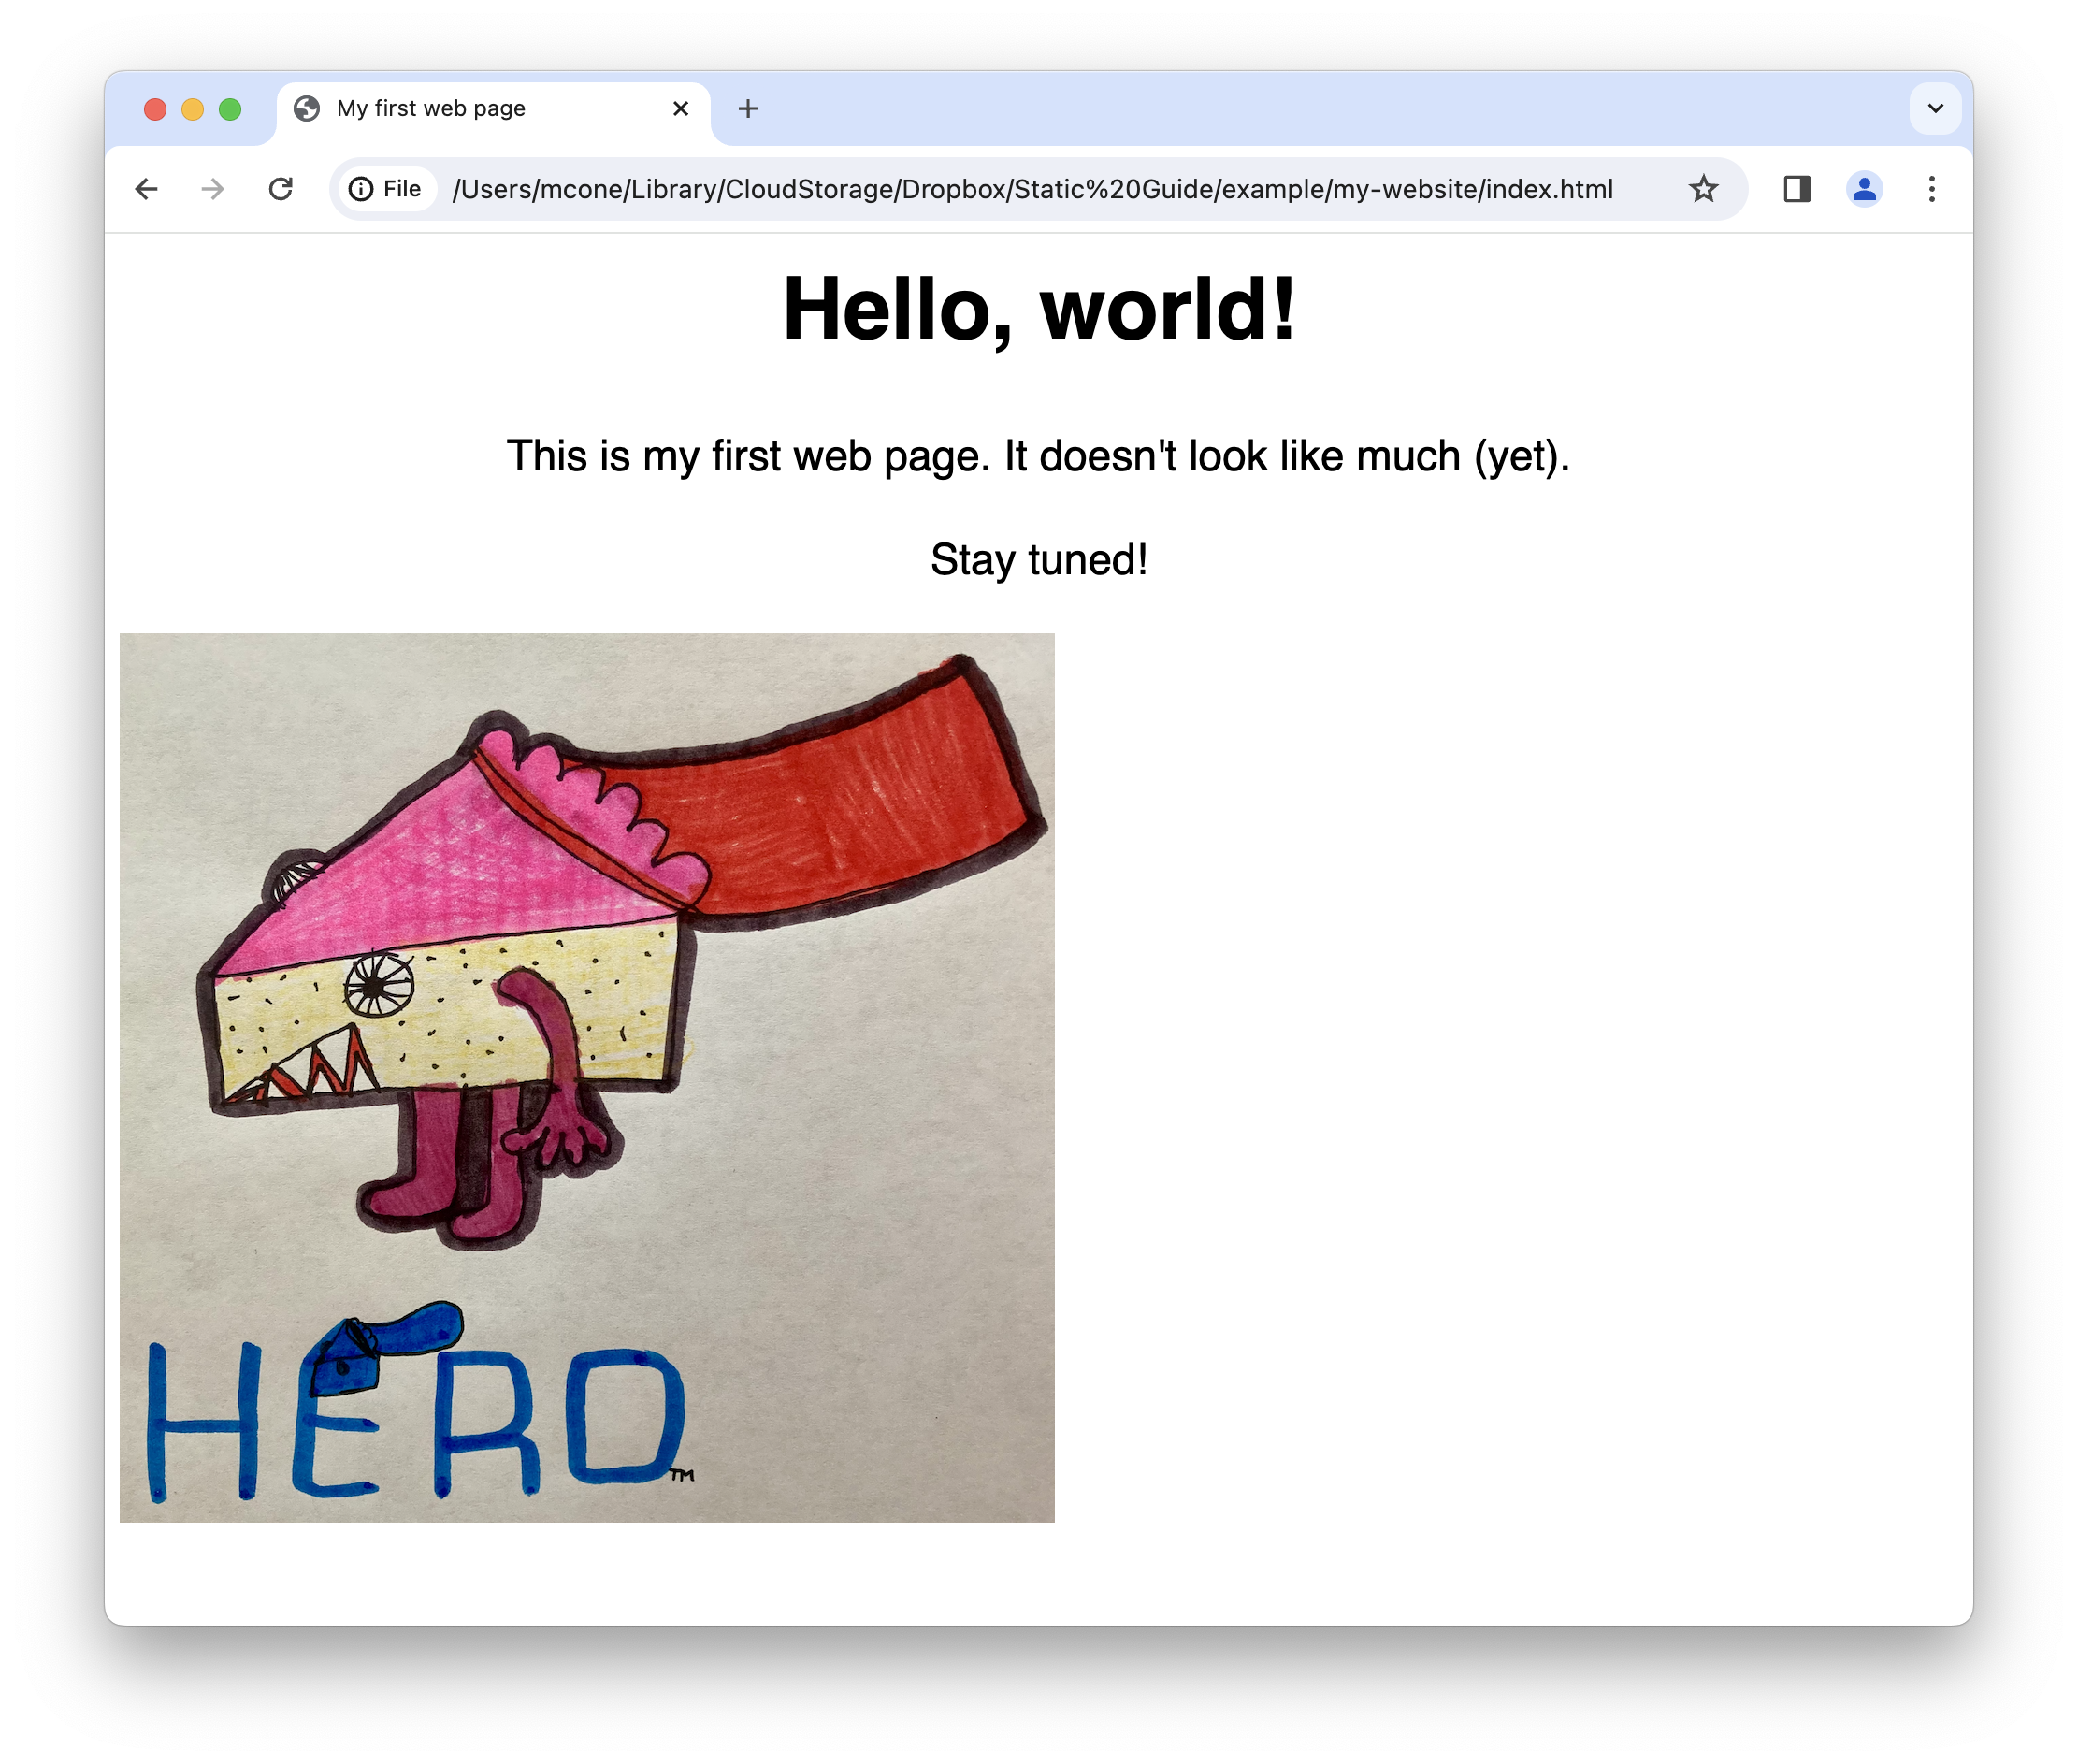
Isn’t that neat? We changed the look and feel of our web page without even touching the HTML!
That said, there are times when we’ll need to change the HTML in support of our CSS. For example, say we want to change the color of the text in one paragraph but not the others. We could add a class attribute to the paragraph tag of the paragraph we wanted to change, like this:
<p class="special">This is my first web page. It doesn't look like much (yet).</p>
To target the special class, we’d update main.css by creating a selector that lists the HTML element selector, like this:
p.special {
    color: red;
}
The font color red will only be applied to paragraphs that use the special class. Let’s see what this looks like on our web page. Update the index.html file with the following code:
<html>
    <head>
        <title>My first web page</title>
        <link rel="stylesheet" href="assets/css/main.css">
    </head>
    <body>
        <h1>Hello, world!</h1>
        <p class="special">This is my first web page. It doesn't look like much (yet).</p>
        <p>Stay tuned!</p>
        <img src="assets/images/hero.png" width="500px" alt="A slice of heaven">
    </body>
</html>
And then update the main.css file with the following code:
body {
    font-family: "Helvetica";
    font-size: 23px;
    line-height: 1.4;
}

h1 {
    text-align: center;
}

p {
    text-align: center;
}

p.special {
    color: red;
}
Let’s open our website in our web browser again. We should see that flaming-red paragraph, in all its glory, as shown below. It worked!

💡 Tip: If you’re interested in learning more about CSS, I can recommend a couple of resources. CSS Zen Garden is a bit dated (it launched in 2005), but I still think it’s one of the best introductory resources for learning how CSS works. Pick a style from the sidebar and see how it changes the look and feel of the entire website! I also like MDN’s free CSS course. And if you’re into books, HTML and CSS: Design and Build Websites is a fantastic option.
Using a CSS Framework
Hopefully, the previous section gave you a feel for what’s possible with CSS. It’s a powerful way of changing the presentation of our website!
We could continue creating custom CSS to style our web page, but there’s an even better solution. By using something called a CSS framework, we can take advantage of hundreds of prebuilt styles and components that other people have created and shared—for free.
We’ll use Bootstrap, one of the most widely-used CSS frameworks. It’s free to use, easy to install, and simple to configure. Installing Bootstrap is as easy as adding one line to our index.html file in between the head HTML tags:
<link href="https://cdn.jsdelivr.net/npm/bootstrap@5.3.3/dist/css/bootstrap.min.css" rel="stylesheet" integrity="sha384-QWTKZyjpPEjISv5WaRU9OFeRpok6YctnYmDr5pNlyT2bRjXh0JMhjY6hW+ALEwIH" crossorigin="anonymous">
Like the custom CSS we created in the previous section, Bootstrap at its core is just a bunch of CSS code in a file. What this new line in our HTML file will do is load the entire Bootstrap CSS file from another server so we don’t have to download it and add it to our directory structure. We could download the Bootstrap CSS file and put it in our directory structure if we wanted, but at this point, it’s easier to add the single line and load Bootstrap from an external server.
In addition to adding the line for Bootstrap, we’ll also remove the line for our custom CSS file and delete the special class we added to the p HTML tag. Our index.html file now looks like this:
<html>
    <head>
        <title>My first web page</title>
        <link href="https://cdn.jsdelivr.net/npm/bootstrap@5.3.3/dist/css/bootstrap.min.css" rel="stylesheet" integrity="sha384-QWTKZyjpPEjISv5WaRU9OFeRpok6YctnYmDr5pNlyT2bRjXh0JMhjY6hW+ALEwIH" crossorigin="anonymous">
    </head>
    <body>
        <h1>Hello, world!</h1>
        <p>This is my first web page. It doesn't look like much (yet).</p>
        <p>Stay tuned!</p>
        <img src="assets/images/hero.png" width="500px" alt="A slice of heaven">
    </body>
</html>
If you reload the web page in your web browser, you’ll notice that the font has changed, but other than that, our web page looks the same.
At this point, we’ve taken our example web page as far as we can. To take full advantage of Bootstrap, we’ll need to create some new HTML code for our index.html file. I’ve gone ahead and created some code that we’ll be using for rest of this section. Delete the existing code in the index.html file, copy and paste the following code into index.html, and then save the changes.
<html>
    <head>
        <title>Heroic Tiramisu</title>
        <link href="https://cdn.jsdelivr.net/npm/bootstrap@5.3.3/dist/css/bootstrap.min.css" rel="stylesheet" integrity="sha384-QWTKZyjpPEjISv5WaRU9OFeRpok6YctnYmDr5pNlyT2bRjXh0JMhjY6hW+ALEwIH" crossorigin="anonymous">
    </head>
    <body>
        <div class="container">
            <header class="d-flex flex-wrap justify-content-center py-3 mb-4 border-bottom">
              <a href="/" class="d-flex align-items-center mb-3 mb-md-0 me-md-auto text-dark text-decoration-none">
                <span class="fs-4">Heroic Tiramisu</span>
              </a>
              <ul class="nav nav-pills">
                <li class="nav-item"><a href="#" class="nav-link active" aria-current="page">Home</a></li>
                <li class="nav-item"><a href="#" class="nav-link">About</a></li>
              </ul>
            </header>
        </div>

        <div class="px-4 pt-5 my-5 text-center border-bottom">
            <h1 class="display-4 fw-bold">Embark on the Hero's Journey</h1>
            <div class="col-lg-6 mx-auto">
              <p class="lead mb-4">Heroic Tiramisu is an example website for the Static Site Guide.</p>
              <div class="d-grid gap-2 d-sm-flex justify-content-sm-center mb-5">
                <button type="button" class="btn btn-primary btn-lg px-4 me-sm-3">Learn more</button>
              </div>
            </div>
            <div class="overflow-hidden" style="max-height: 70vh;">
              <div class="container px-5">
                <img src="assets/images/hero.png" class="img-fluid border rounded-3 shadow-lg mb-4" alt="Heroic Tiramisu logo" width="900" height="1000" loading="lazy">
              </div>
            </div>
        </div>
    </body>
</html>
At first glance, this wall of code might look daunting. Don’t panic—you’ve got this. The lines in this file contain elements you’ve seen before: HTML tags, CSS class attributes, and text. Of course, there are also some things we haven’t seen yet. Let’s talk about those now.
The biggest difference between this new code and our previous code is all of the class attributes. Everything has a class attribute now! The class attributes are what connect the HTML elements in our code to the pre-made components in the Bootstrap CSS file.
There are also a couple of new HTML elements that we haven’t seen before. The header element is designed to hold introductory content—in this case, our website’s navigation bar. And the div HTML tag is a generic container for content. It doesn’t do anything until it’s styled by CSS.
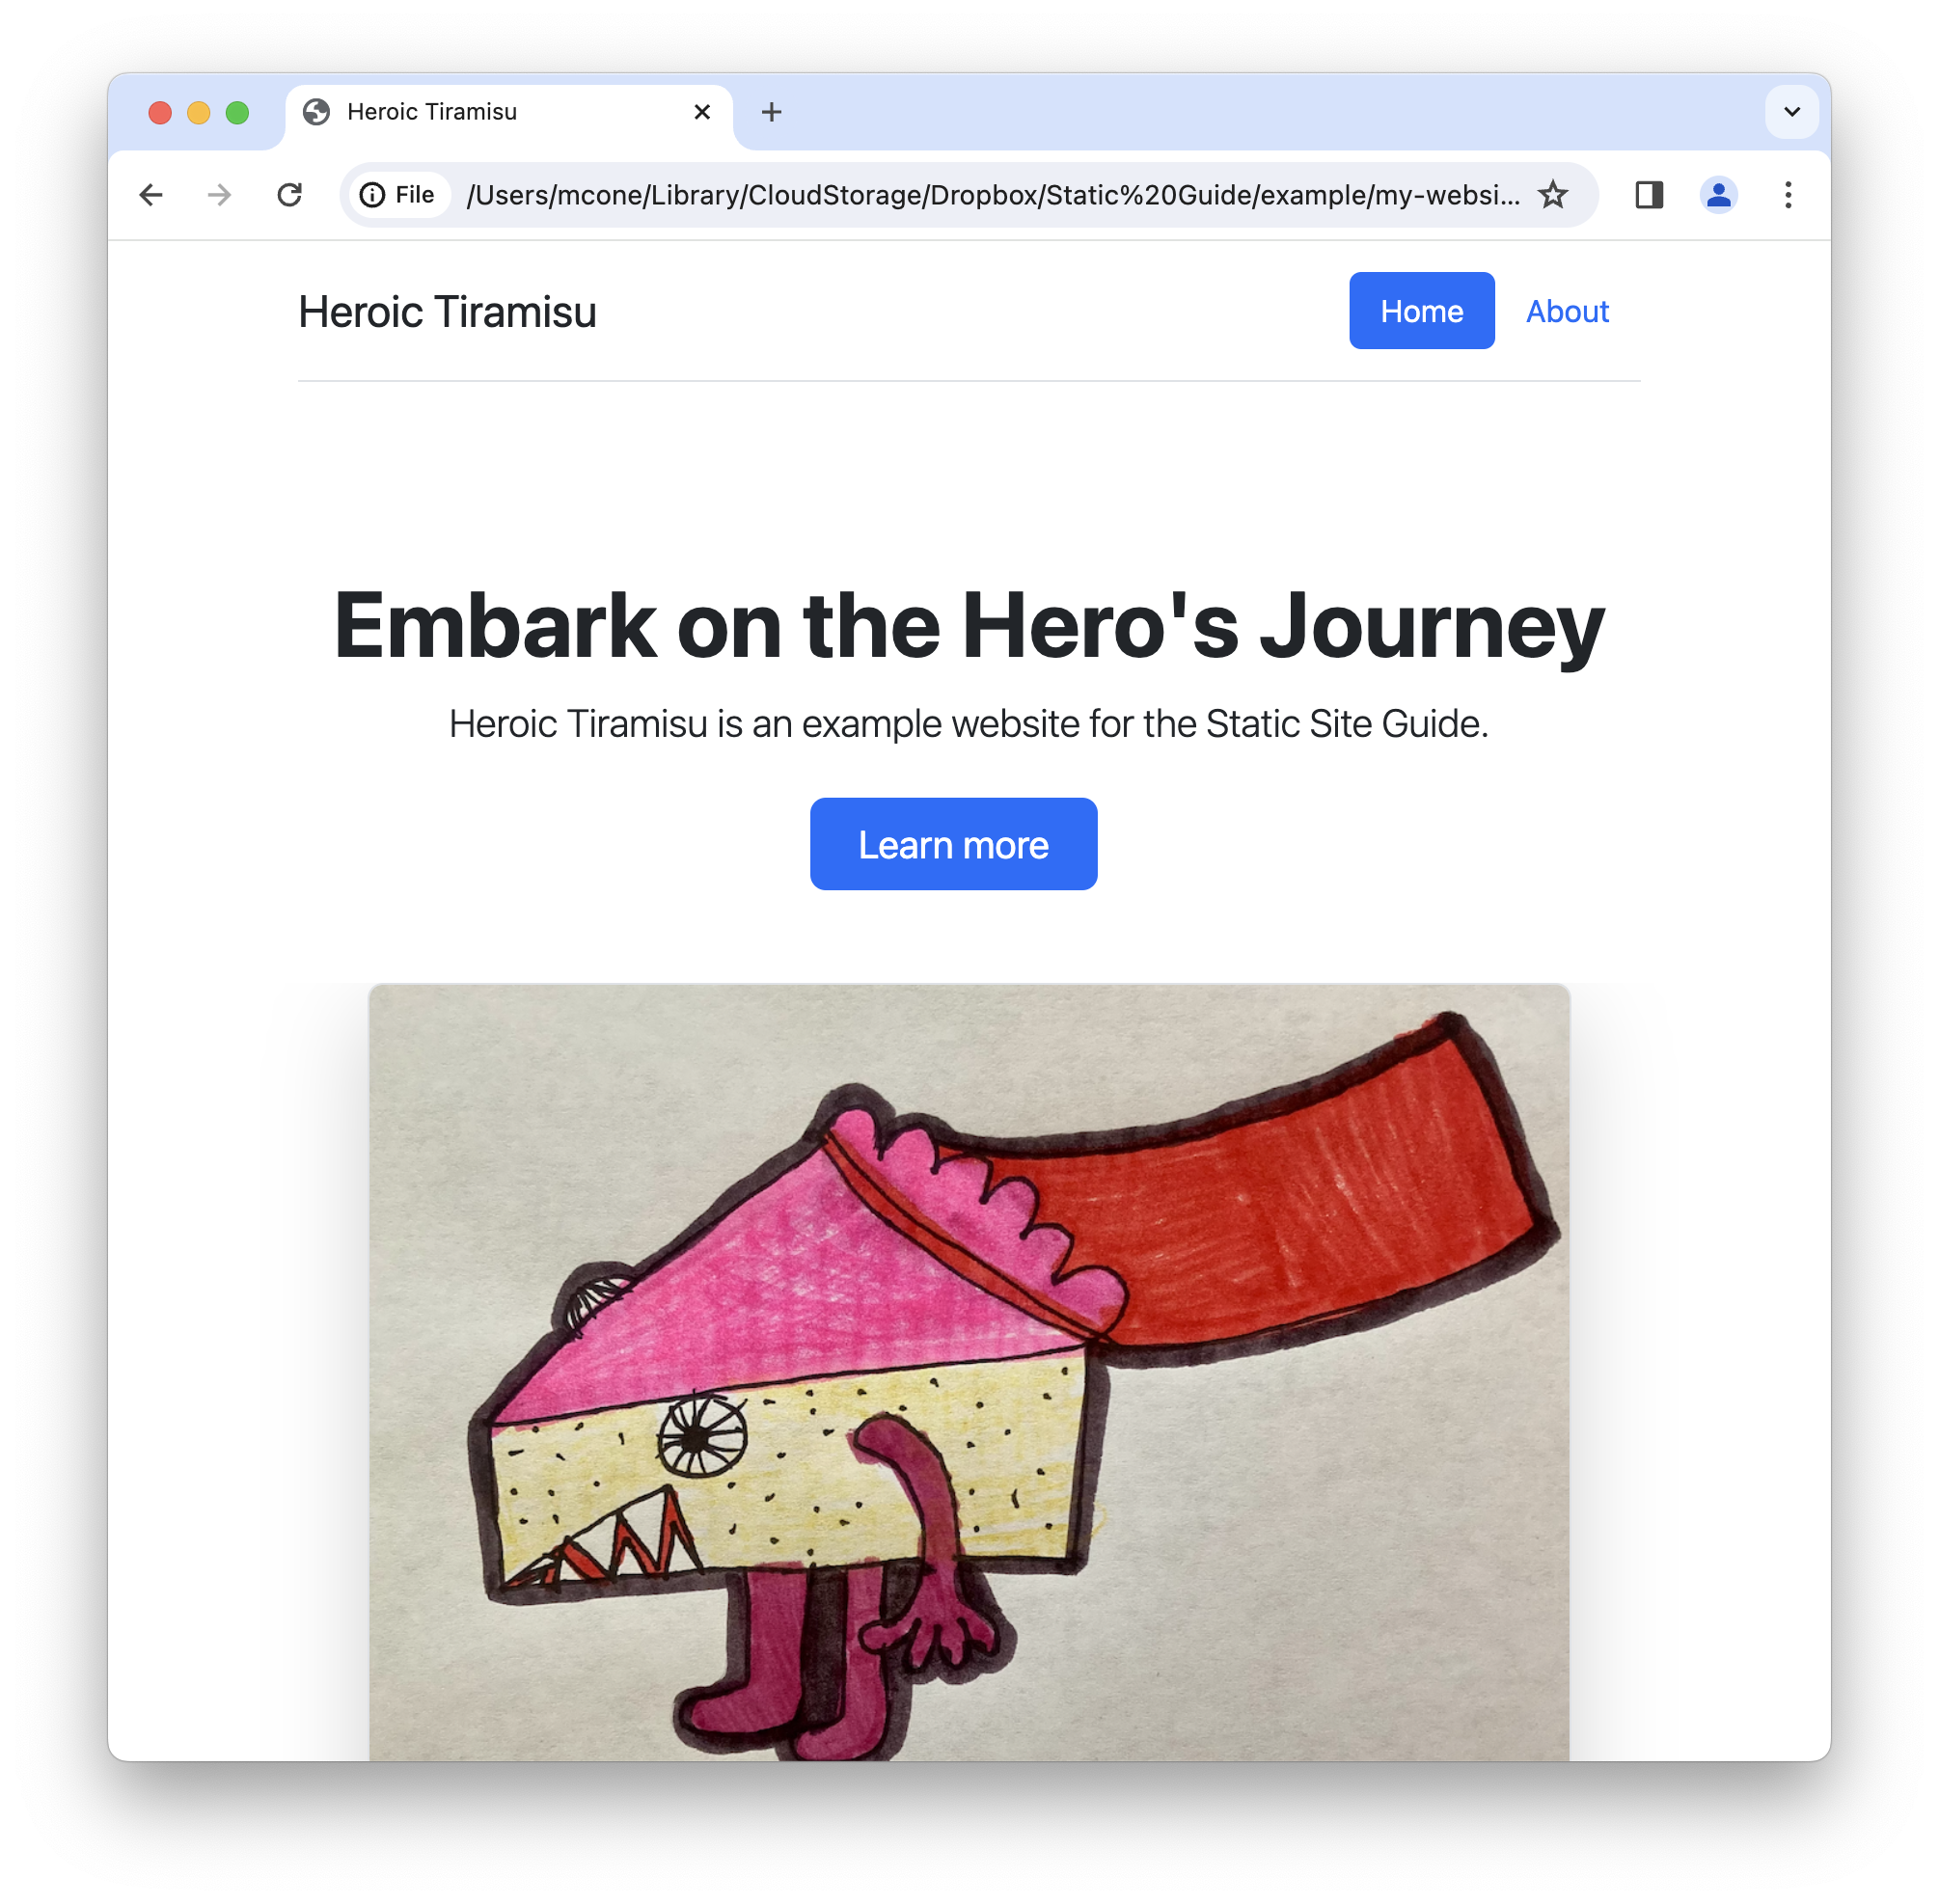
Let’s take a look at how the page looks now. Save index.html if you haven’t already done so, and then open the file in your web browser. The new web page is shown below.
Bootstrap has great documentation and examples. If you feel like it, take a break to explore what’s possible with Bootstrap and try adding some other components to your web page.
💡 Tip: You might be wondering about the new name of our website, Heroic Tiramisu. My kids came up with this random name and we decided to run with it. They also drew all of the artwork!
An Aside on Embracing Curiosity
Whew! Give yourself a pat on the back. You’ve done a lot of work to get to this point.
Let’s pause for a moment and talk about the importance of curiosity. When it comes to learning technologies like HTML and CSS, it’s critically important to embrace curiosity with dogged determination. Don’t get bogged down in the details. Keep going, even if you don’t fully understand everything that’s being presented.
It’s easy to get frustrated and overwhelmed by code samples like the one you saw in the previous section. There might even come a time when you consider throwing in the towel. But before you do anything rash, I want to let you in on a couple of secrets.
First, I want to reassure you that not everyone understands this the first time they see it. If you’re not comprehending this material, don’t worry—you’re not alone. Learning web development is a bit like learning a musical instrument. Nobody would expect themselves to sound like Miles Davis the first time they pick up a trumpet. But with practice, hard work, and some help from others, anyone can gain competency and, with time, mastery. It’s the same with web development.
Second, you should know that most web developers, even experienced ones, borrow a lot of code. You’ve probably heard the saying “good artists copy; great artists steal.” It’s true when it comes to web development, too.
Take the code sample from the previous section, for example. Very few people write code like that completely by hand. To create that code, I did what most web designers do: I visited the page on Bootstrap’s website with the list of examples, viewed the source code, and copied the bits and pieces of code I wanted to use. At that point, it was trivial to start experimenting and modifying the code to make it do what I wanted it to do.
You can do the same thing. Believe it or not, this is how most people learn web development. They take existing bits of code and modify them, even if they don’t initially understand what the code is doing. You already have all of the knowledge you need to do this.
💡 Tip: Don’t forget that you can view the source code of any web page.
The truth is that even the “experts” don’t fully understand all of this stuff. That’s where documentation and forums like Stack Overflow and Reddit come in. Millions of people read Bootstrap’s documentation every month. My guess is that the vast majority of those visitors are experienced web developers who need a refresher on how a component works.
When you’re just getting started with web development, you should build your understanding by copying code from other websites and tinkering with it. If you don’t understand something, just keep going! You can always google the parts you don’t understand.
Creating Another Web Page and Adding Links
So far, our website only has a single web page. That’s been useful as far as it goes—it’s easy to update and manage—but it’s also not very realistic. Most websites have many different web pages.
In this section, we’ll add another page to our website. This page will function as the About page on our website. We’ll also link between the two web pages, add another image, and experiment with some other Bootstrap components.
The first step is adding the new web page and image. Let’s look at where these files will live in our directory structure.
my-website
├── about.html
├── index.html
└── assets
    ├── css
        └── main.css
    └── images
        ├── black_droid.png
        └── hero.png
The new black_droid.png image is in the images directory. And see the about.html file there, at the top of the list? It’s in the root of the my-website directory. Go ahead and create the about.html file now using your text editor. You can paste the following code into the file:
<html>
    <head>
        <title>About Heroic Tiramisu</title>
        <link href="https://cdn.jsdelivr.net/npm/bootstrap@5.3.3/dist/css/bootstrap.min.css" rel="stylesheet" integrity="sha384-QWTKZyjpPEjISv5WaRU9OFeRpok6YctnYmDr5pNlyT2bRjXh0JMhjY6hW+ALEwIH" crossorigin="anonymous">
    </head>
    <body>
        <div class="container">
            <header class="d-flex flex-wrap justify-content-center py-3 mb-4 border-bottom">
              <a href="/" class="d-flex align-items-center mb-3 mb-md-0 me-md-auto text-dark text-decoration-none">
                <span class="fs-4">Heroic Tiramisu</span>
              </a>
              <ul class="nav nav-pills">
                <li class="nav-item"><a href="#" class="nav-link">Home</a></li>
                <li class="nav-item"><a href="#" class="nav-link active" aria-current="page">About</a></li>
              </ul>
            </header>
        </div>

        <div class="px-4 pt-5 my-5 text-center">
            <h1 class="display-4 fw-bold">About Heroic Tiramisu</h1>
            <div class="col-lg-6 mx-auto">
              <p class="lead mb-4">This is the about page for Heroic Tiramisu. We love featuring children's artwork!</p>
            </div>
            <div class="container">
                <div class="row">
                  <div class="col">
                    <img src="assets/images/black_droid.png" class="img-fluid">
                  </div>
                  <div class="col">
                    <img src="assets/images/hero.png" class="img-fluid">
                  </div>
                </div>
            </div>
        </div>
    </body>
</html>
You’ll notice that about.html is very similar to index.html. In fact, except for a small change to the title and the link attributes in the navigation bar, it’s the same until the H1 element (About Heroic Tiramisu).
We’ve reused a bunch of code in two places—a big no-no! This is referred to as content duplication. We don’t need to worry about it right now since we only have two web pages, but we’ll discuss how to mitigate content duplication later, when we talk about static site generators.
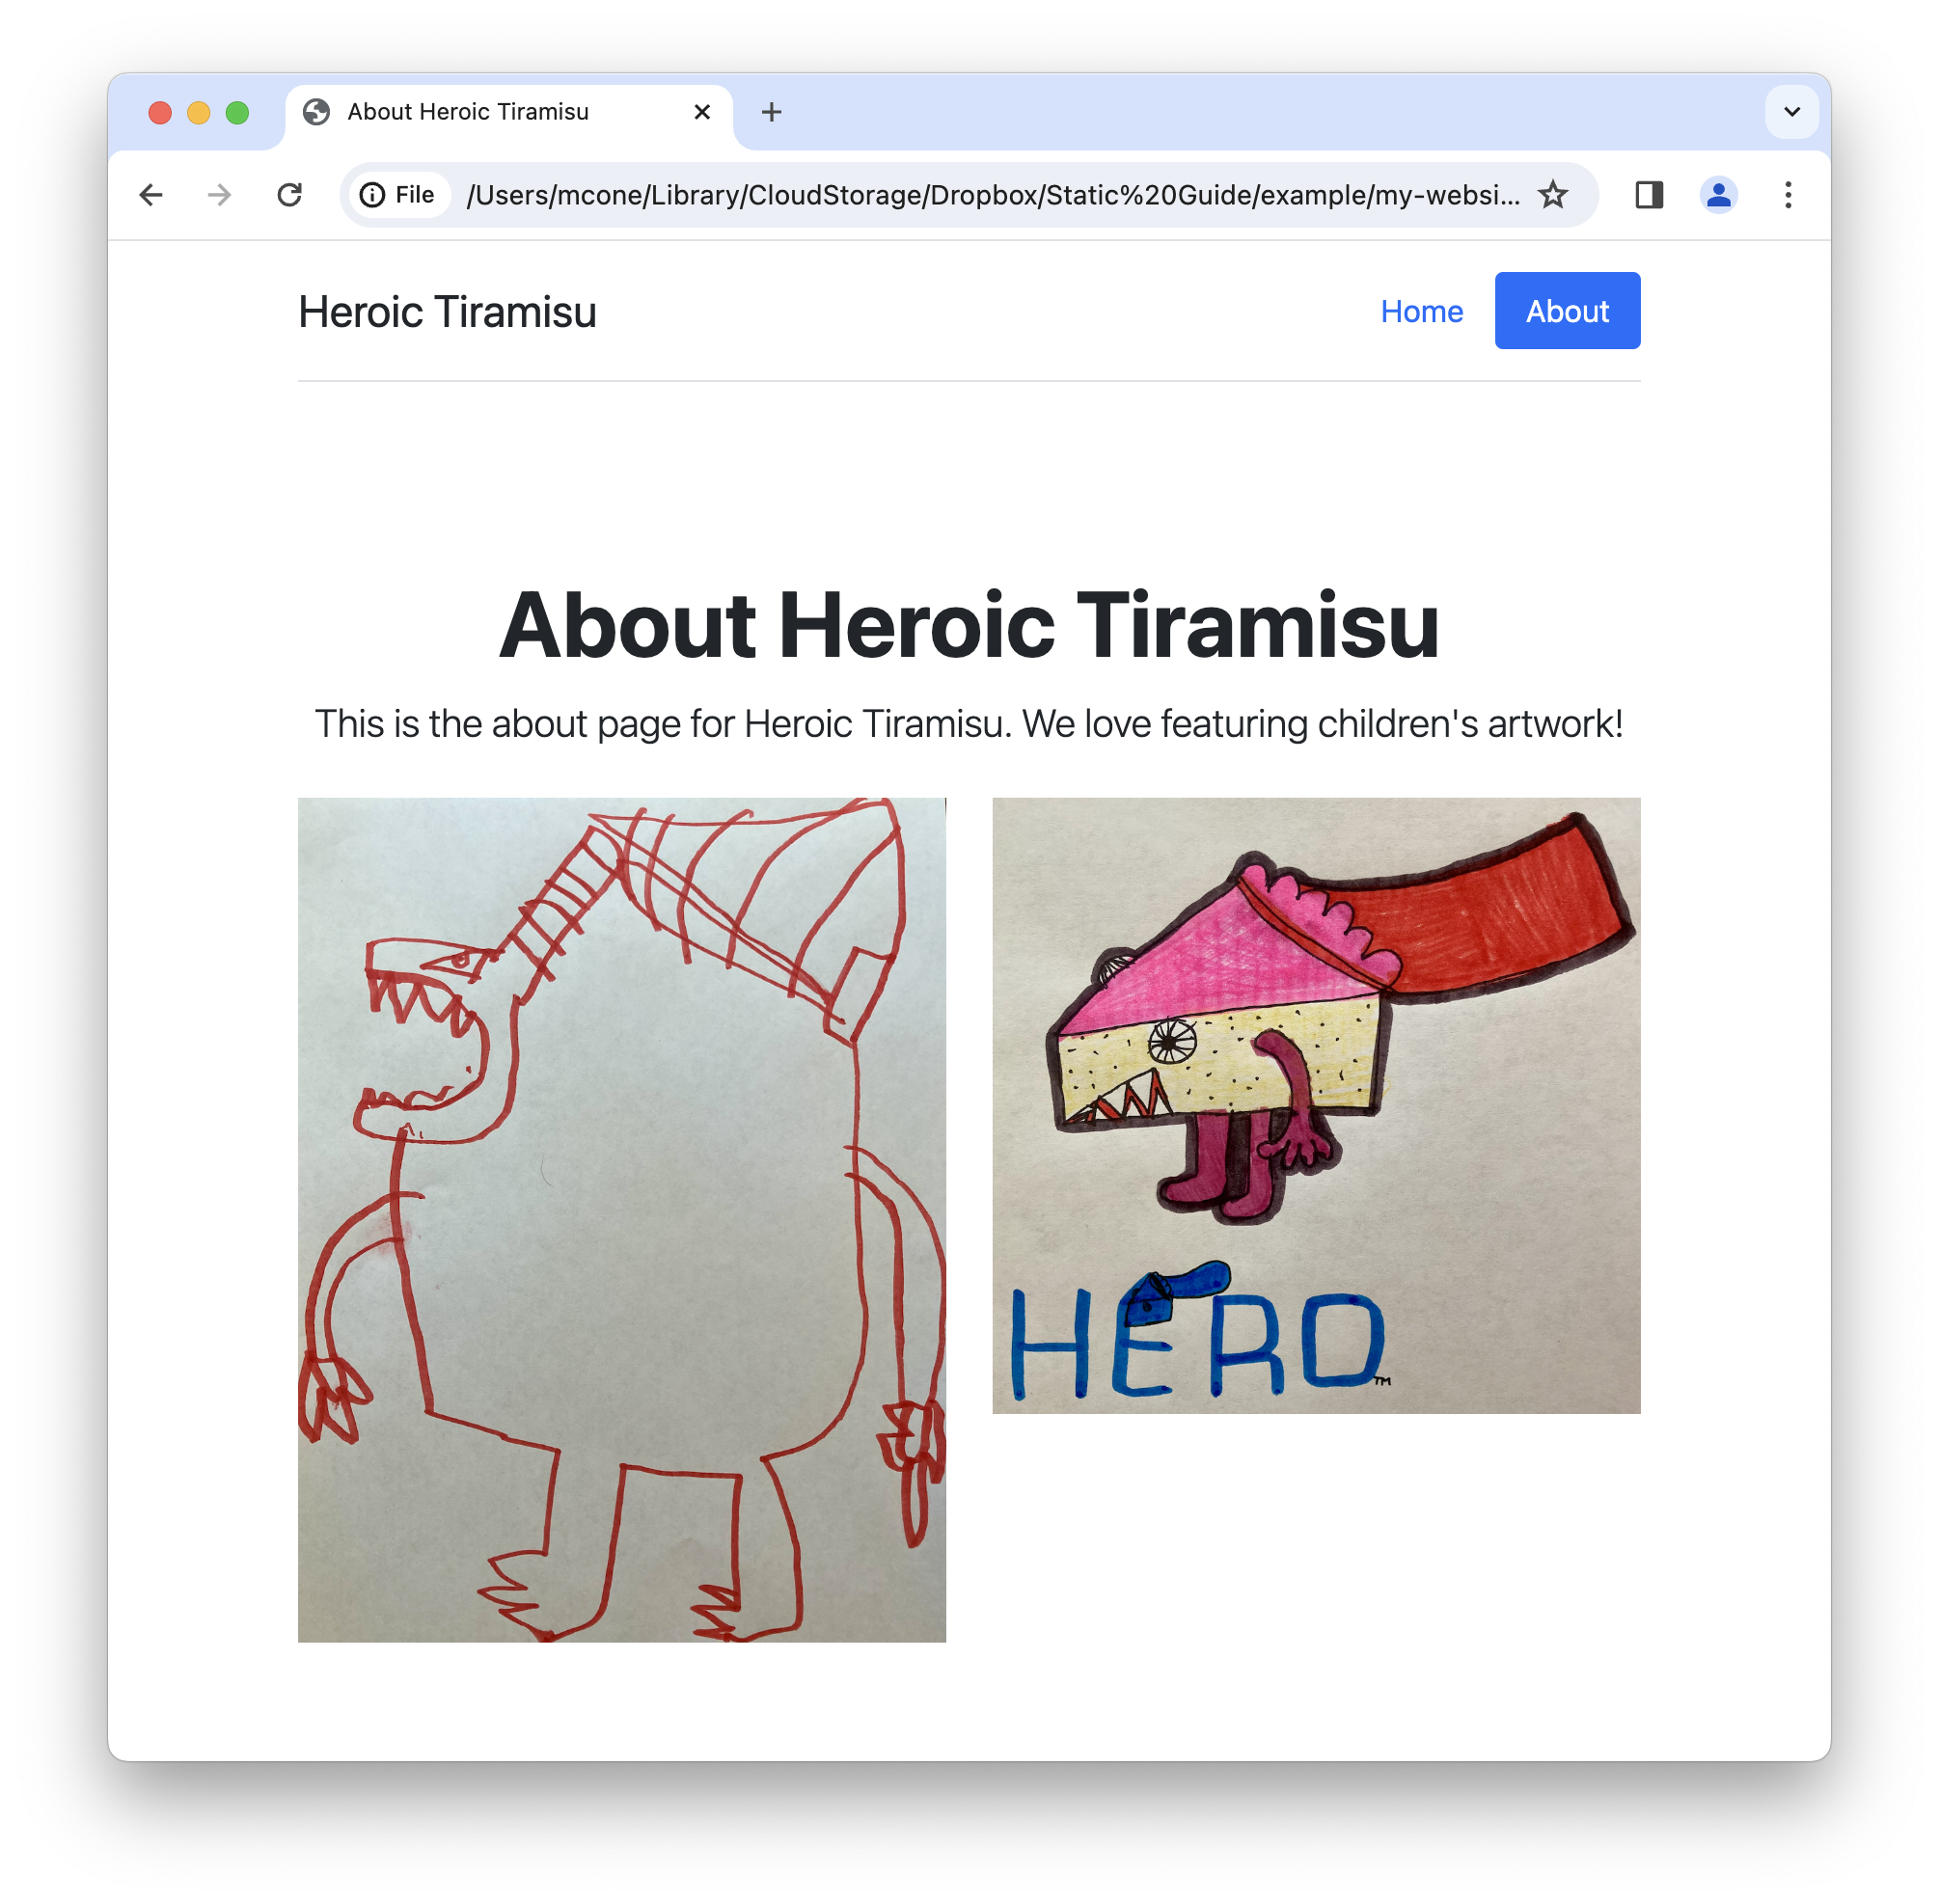
Let’s take a look at how this page looks in our web browser. Remember how we did this for index.hml? In our web browser, we select Open File from the File menu, browse to the my-website directory, and then open the about.html file. We’ll see the About page, as shown below.
Now we need to link from the homepage (index.html) to the About page (about.html), and vice versa. We can create links by using the a HTML tag:
<a href="https://www.staticguide.org">Visit the Static Site Guide to learn how to build a website.</a>
The destination URL is listed inside the HTML tag with the href attribute. This is where the user will go if they click the link. The text that appears as the link on the HTML page is listed between the two HTML tags.
The URL in the example above is a fully-qualified URL. A fully-qualified URL has the entire domain name in the URL. Sometimes you need to use fully-qualified URLs, like when you’re linking to a different website. But as with image files, when you’re linking to a page on your website, you should use a relative path.
Remember, relative paths contain the path to the web page relative to the directory structure, but they don’t contain the domain of the website. So if we wanted to link to the about.html page on our website, we would use <a href="about.html"> and not <a href="https://sensational-duckanoo-efb1d0.netlify.app/about.html">. The advantage of relative paths is that they work wherever you happen to be hosting your website, whether that’s your personal computer or a web server.
Now that we know what links look like, we can replace the empty links in our index.html and about.html files with relative paths to the pages in our website’s directory.
Here’s what the new index.html looks like with the links added:
<html>
    <head>
        <title>Heroic Tiramisu</title>
        <link href="https://cdn.jsdelivr.net/npm/bootstrap@5.3.3/dist/css/bootstrap.min.css" rel="stylesheet" integrity="sha384-QWTKZyjpPEjISv5WaRU9OFeRpok6YctnYmDr5pNlyT2bRjXh0JMhjY6hW+ALEwIH" crossorigin="anonymous">
    </head>
    <body>
        <div class="container">
            <header class="d-flex flex-wrap justify-content-center py-3 mb-4 border-bottom">
              <a href="index.html" class="d-flex align-items-center mb-3 mb-md-0 me-md-auto text-dark text-decoration-none">
                <span class="fs-4">Heroic Tiramisu</span>
              </a>
              <ul class="nav nav-pills">
                <li class="nav-item"><a href="index.html" class="nav-link active" aria-current="page">Home</a></li>
                <li class="nav-item"><a href="about.html" class="nav-link">About</a></li>
              </ul>
            </header>
        </div>

        <div class="px-4 pt-5 my-5 text-center border-bottom">
            <h1 class="display-4 fw-bold">Embark on the Hero's Journey</h1>
            <div class="col-lg-6 mx-auto">
              <p class="lead mb-4">Heroic Tiramisu is an example website for the Static Site Guide.</p>
              <div class="d-grid gap-2 d-sm-flex justify-content-sm-center mb-5">
                <a href="about.html" type="button" class="btn btn-primary btn-lg px-4 me-sm-3">Learn more</a>
              </div>
            </div>
            <div class="overflow-hidden" style="max-height: 70vh;">
              <div class="container px-5">
                <img src="assets/images/hero.png" class="img-fluid border rounded-3 shadow-lg mb-4" alt="Heroic Tiramisu logo" width="900" height="1000" loading="lazy">
              </div>
            </div>
        </div>
    </body>
</html>
And here’s what the about.html page looks like with the links added:
<html>
    <head>
        <title>About Heroic Tiramisu</title>
        <link href="https://cdn.jsdelivr.net/npm/bootstrap@5.3.3/dist/css/bootstrap.min.css" rel="stylesheet" integrity="sha384-QWTKZyjpPEjISv5WaRU9OFeRpok6YctnYmDr5pNlyT2bRjXh0JMhjY6hW+ALEwIH" crossorigin="anonymous">
    </head>
    <body>
        <div class="container">
            <header class="d-flex flex-wrap justify-content-center py-3 mb-4 border-bottom">
              <a href="index.html" class="d-flex align-items-center mb-3 mb-md-0 me-md-auto text-dark text-decoration-none">
                <span class="fs-4">Heroic Tiramisu</span>
              </a>
              <ul class="nav nav-pills">
                <li class="nav-item"><a href="index.html" class="nav-link">Home</a></li>
                <li class="nav-item"><a href="about.html" class="nav-link active" aria-current="page">About</a></li>
              </ul>
            </header>
        </div>

        <div class="px-4 pt-5 my-5 text-center">
            <h1 class="display-4 fw-bold">About Heroic Tiramisu</h1>
            <div class="col-lg-6 mx-auto">
              <p class="lead mb-4">This is the about page for Heroic Tiramisu. We love featuring children's artwork!</p>
            </div>
            <div class="container">
                <div class="row">
                  <div class="col">
                    <img src="assets/images/black_droid.png" class="img-fluid">
                  </div>
                  <div class="col">
                    <img src="assets/images/hero.png" class="img-fluid">
                  </div>
                </div>
            </div>
        </div>
    </body>
</html>
Let’s take a look at how the links work. Save index.html and about.html if you haven’t already done so, and then open one of the files in your web browser. Try clicking the links. See how you can move back and forth between the web pages? Neat, right?
Now we’ll push our updates to Netlify to update the version of our website that’s published on the internet.
Publishing the Updates
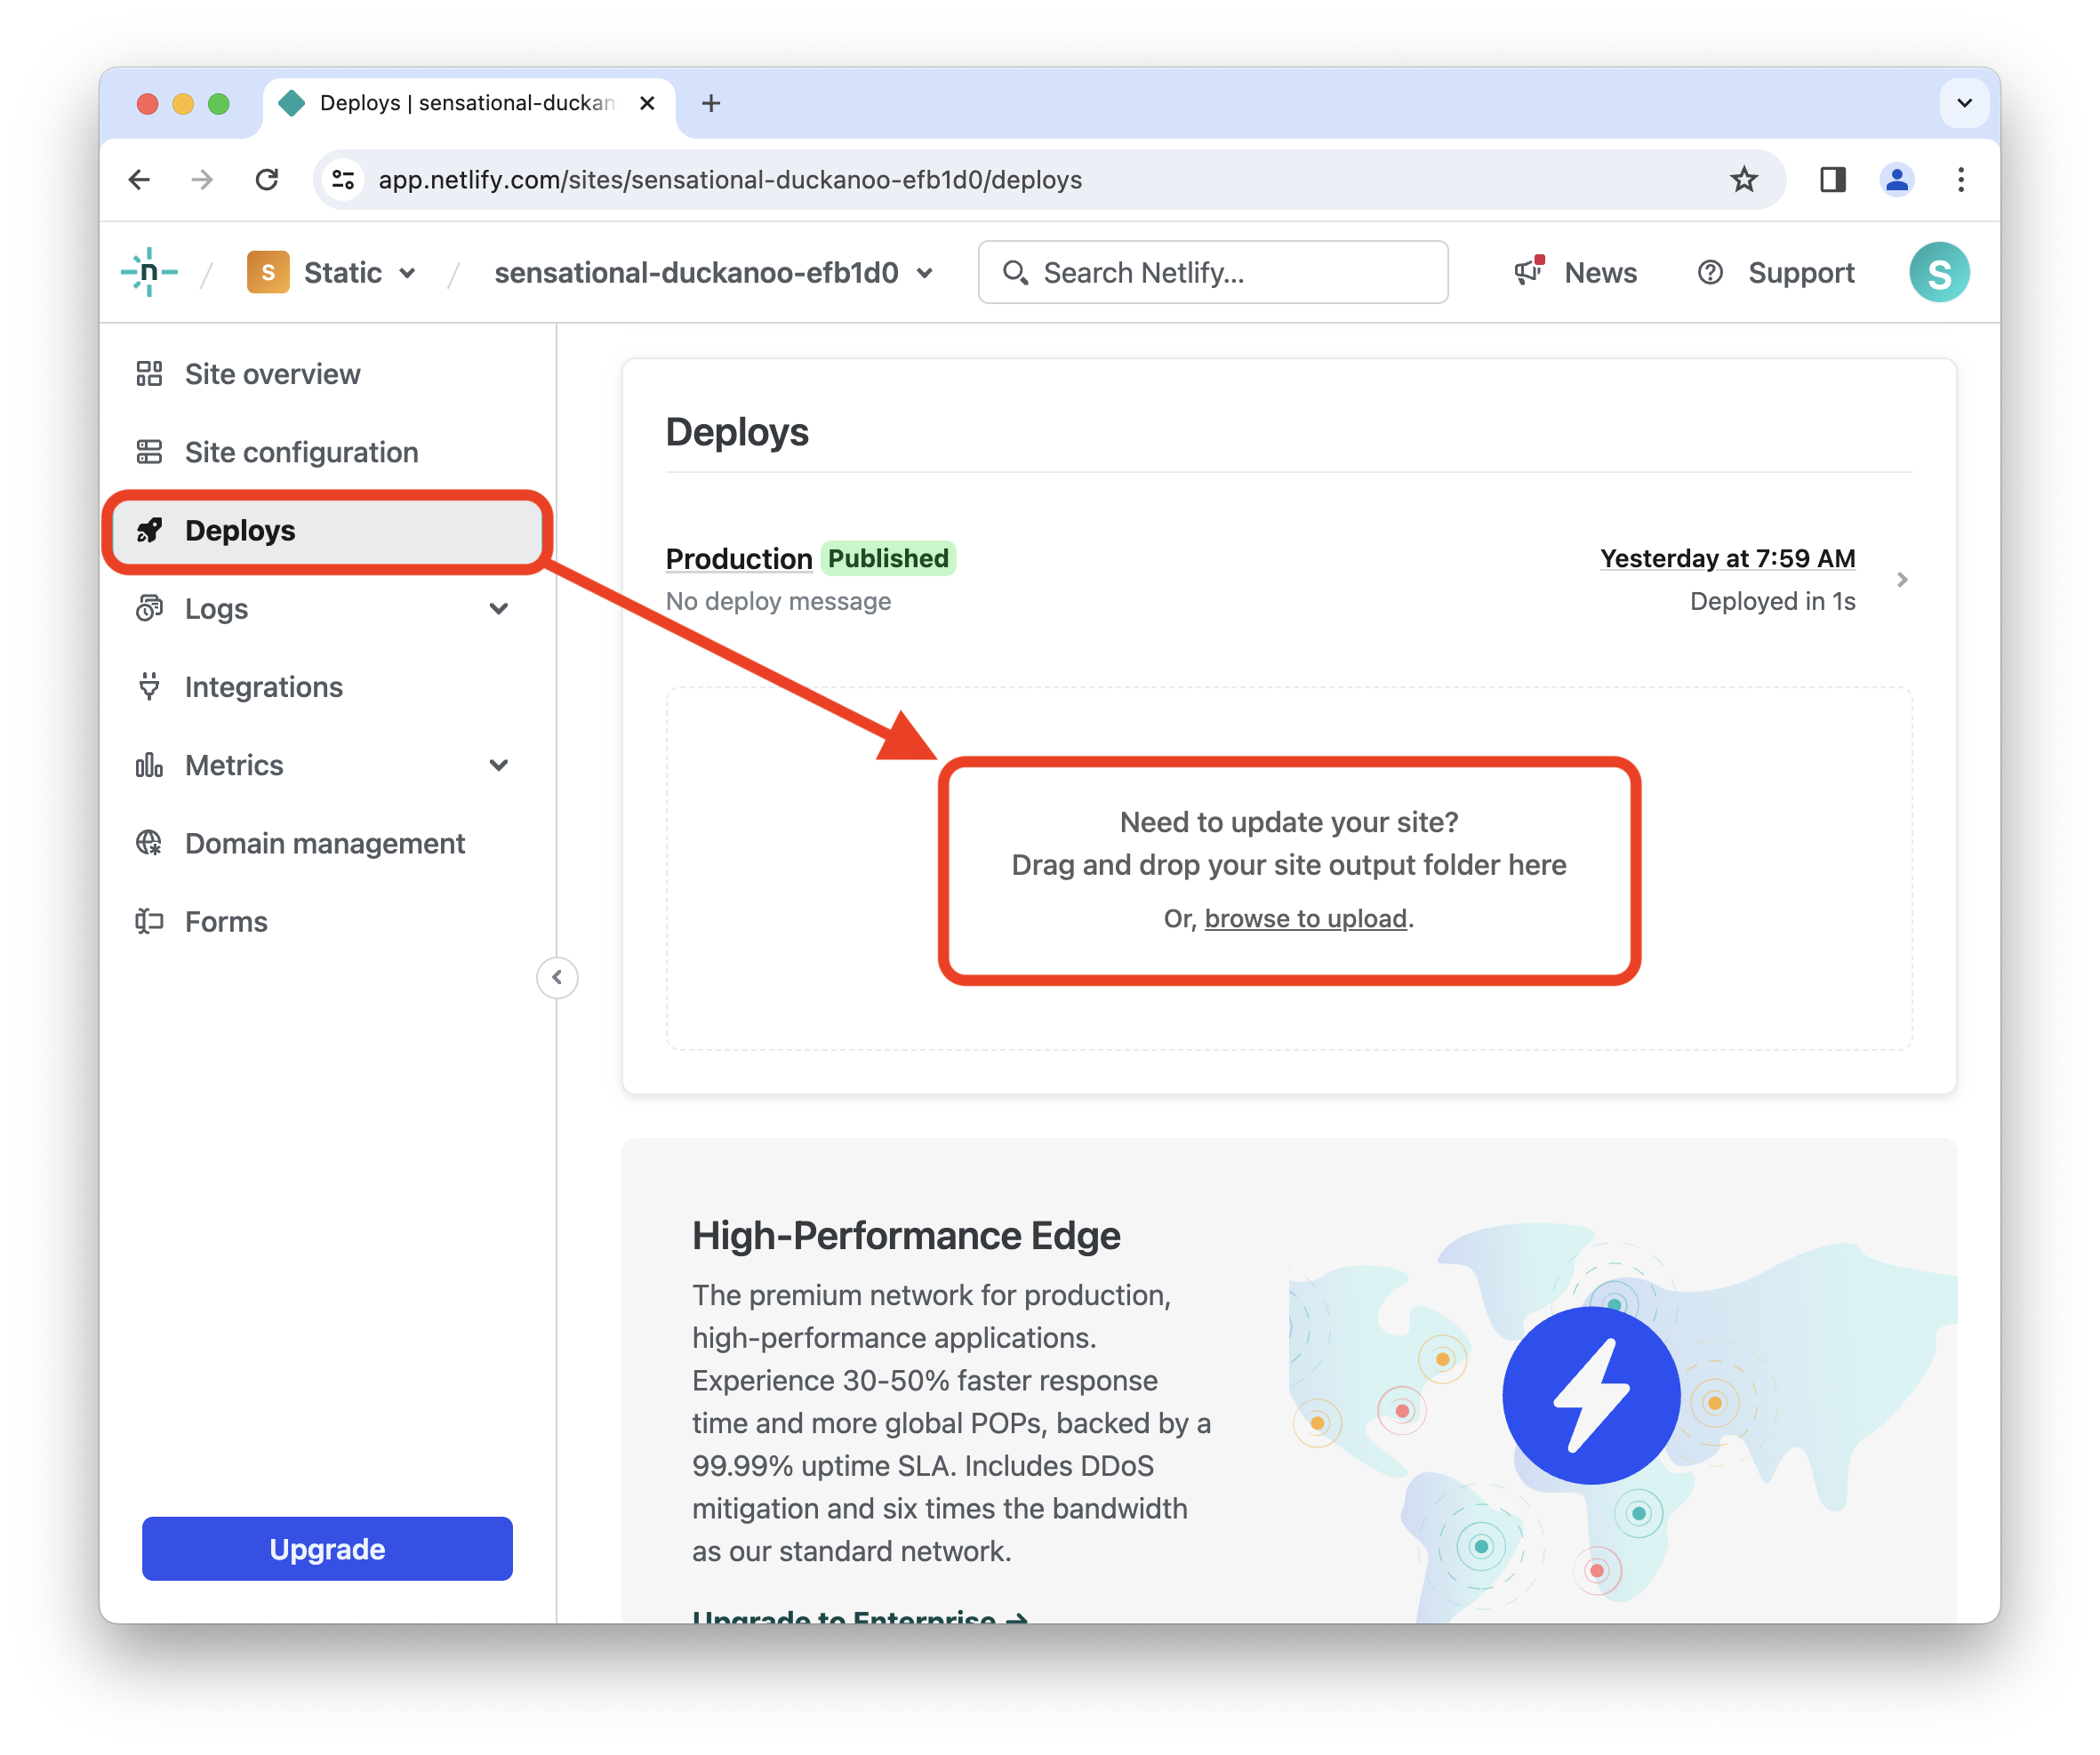
To publish the updates on our public website, we’ll go back to Netlify and drag and drop our website’s folder onto Netlify’s website. You can do this by logging in to Netlify, clicking the Deploys link, and then dragging your website folder onto the box in the middle of the page, as shown below.
After Netlify uploads your website, type in your domain name to see the changes. Your updates have been published on the internet!
Next Steps
We’ve barely scratched the surface of what’s possible with HTML and CSS. But in keeping with the goal of this book, which is to teach you how to build a static website from scratch by presenting practical information you can put to use immediately, we need to move on. There’s a lot more to cover!
I encourage you to continue experimenting with HTML and CSS on your own. A good next step would be following along with the HTML basics and CSS basics guides on the MDN Web Docs website. Then you can return to your website and continue adding elements to the source code.
Remember, you already have all the information you need to continue learning and building. Embrace curiosity with dogged determination. The sky’s the limit!